Prepare for Cyber Monday: The Ultimate Guide
November has already started its walk, and that means only in 1 month we’ll have Cyber Monday. It is a great opportunity for the business owners to promote their brand and increase their sales drastically.
What is Cyber Monday?
Cyber Monday comes after Black Friday as a great opportunity for the online stores. It’s a perfect day for growing your sales online because people still continue to buy products at the online shops via their office computers.
This guide is based on the case study and results of the experts who gave the report on a webinar organized by Magento®.
What We Plan to Do?
We are going to follow a 4-week plan of preparation for Cyber Monday on November 27th. You’ll get the cycle of articles, which will help you to prepare for any kind of holiday and event. Each of these articles will describe one step of our plan. Like before the sports competition, we’ll do several activities:
1. Warm-up. As a result of warm-up, you will be able to:
- see the moments that need improvement;
- count the supposed revenue from the successful campaign;
- estimate the necessary resources and needed budget.
2. Bulking up on content. As a result, you will be able to:
- organize a customers base and segment them for targeted campaign;
- create the targeted content for each channel and an audience group;
- develop the successful themed design for each campaign.
3. Outrunning the opponent. As a result, you’ll be able to:
- know what advantages and disadvantages has your opponent;
- plan your efficient promotional campaign before the Cyber Monday;
- prepare a customer for shopping in your online store on Cyber Monday.
4. Final stretch. As a result, you’ll be able to:
- finally, prepare your online store for Cyber Monday;
- plan all promotional campaigns for Cyber Monday;
- test everything and be sure that your campaigns work right.
then we’ll meet Cyber Monday and our victory on November 27th.
A bonus for winter holidays: you’ll learn how to get all benefits before and after the winter holidays in December and January and summarize the results.
Why is Cyber Monday So Important?
As the statistic says, if the campaign is successful, we can get the following results between November 1st and December 31st:
- up to 6% of holiday revenue in December;
- up to 70% increase in sales from November 20th to November 27th.
And you should also know that 40% of shoppers start their holiday shopping by Halloween. Following the statistics, we can create the calculation formula of supposed revenue.
Let’s imagine that:
- we have 5000 visitors on your website a week;
- our conversion rate is 5%;
- our average check is 100$ a week.
Let’s calculate our supposed revenue (SRev) from the week before Cyber Monday.
SRev = average weekly revenue 70% growth in week before Cyber Monday revenue
Average weekly revenue: 5000 * 5% *100$ = 25000$
70% growth in week before Cyber Monday revenue: 25000$ * 70% = 17500$
SRev: 25000$ 17500$ = 42500$
So, you can put your values to this formula and calculate your supposed revenue. If you prepare for the Cyber Monday correctly, you’ll get the high revenue.
And we’ll help you to be ready.
By the way, now we are working on the “white paper” on Cyber Monday and preparation for any holiday in the online stores. Subscribe to our newsletter, and we promise to send it to you when it is ready.
The Problems of Cyber Monday
Firstly, we should focus on the things that work and things that don’t work. The main task is to be aware of the common problems and find the solution for them.
Here are the main problems of Cyber Monday:
- Slow and crashing websites. When the number of your online store visitors increases in many times, the servers could be overloaded.
That’s why we should check the peak website load and page loading speed. In general, good speed is 1-2 seconds per page, not more. And page loading speed affects the conversion. So, pay a special attention to these moments and improve them if you need. The following tools can help you to test your website and know the page loading speed: Pingdom, Website Grader, Google PageSpeed insights.
- Not having channel-by-channel and overall measuring marketing plan. If we want to get results and take control of everything, the goals should be measurable and result fixed. We should create a step-by-step plan for our going to the victory.
Decide what channels you will use for promotion (social networks, email marketing, advertising, landing pages) and set up the goals in Google Analytics.
- Not planned budget. If we are going to create a marketing campaign, we should know how many resources we need and the main steps.
Estimate the necessary number of resources you can spend on each channel.
- Unprofitable discounts. It really happens. When everybody offers discounts, they lose their value.
So we need to come up with something new in order to stand out from the crowd.
- Timing. Again, when everybody starts to send promotional email newsletters on Monday, you can’t predict the best time for the successful email campaign.
Launch your marketing campaigns a week before Cyber Monday and offer profitable discounts and coupons, which people we’ll be able to use on Cyber Monday shopping. Start to prepare your customers.
So, we offer you the following. First of all, consider these problems and try to find the solutions for them. Create a sheet and fill it with ideas.
Click on the image below, and you’ll get the access to the sheet we prepared for you. You can copy it and fill with your data.
Stay with us, and the next time we’ll do the warm-up. Hurry up – it’s 3 weeks between Now and Cyber Monday. The time is on.
Ready, steady, go!
P.S. Don’t forget to subscribe to our newsletter and get the Cyber Monday “white paper” for free after its release.
Case study: Migrating to Magento 2 for E-Store
Everybody knows that Magento® released a new version, which has already become the wished platform for the website owners who like to follow trends and keep pace with time.
WEB4PRO team completed the project based on Magento 2. So we did something we can be proud of.
We had a task to perform migration to Magento 2 for the jewelry online store based on Magento. The most works were done on the back-end. And it took us nearly a month to complete the task.
Migration to Magento 2: How It Was
First of all, we migrated all online store data to Magento 2. Also, there were several custom modules that needed to be moved to Magento 2. So we converted them, and it allowed the store owner to get all his custom solution safely.
The next thing we did was the extending of Ajax adding to cart. The solution was in creating the block which shows the product added to the cart after the user adds it.
Also, we customize the search on the store and adapted the layout to the design.
State API and Configuration API in Drupal 8
Very often we need to write some data into the variable, which we can replace at any moment of use. There are two such functions in Drupal 7: variable_get() and variable_set(). In Drupal 8 we have State API and Configuration API for these purposes. In this article, you’ll familiarize with their use and also tell the difference between them.
State API
State API should be used bypassing configuration only when your goals of use meet the following requirements:
- This API will be used for storage of some system information;
- You are not going to transfer the setup data from server to server because the data won’t be saved in case of exporting configuration;
- These data won’t be edited by the user through the interface.
A good example of State API use is storing the timestamp of the last cron operation run.
State API: Writing Values
For entry, we should use a pair: a key and a value.
Drupal::state()->set('key','value');For multiple entries we use the following code:
// $values - array with the couple of key and value.
$values = [
'key1' => 'value1',
'key2' => 'value2'
];
Drupal::state()->setMultiple($values);
State API: Getting Data
Getting one value with a key.
$val = Drupal::state()->get('key');Getting several values:
$keys = [
'key',
'key2'
];
$pairs = Drupal::state()->getMultiple($keys).// $values - array with the couple of key and value.
$values = [
'key1' => 'value1',
'key2' => 'value2'
];
Drupal::state()->setMultiple($values);
State API: Deleting Data
Deletig is accessible only with one value:
Drupal::state()->delete('key');When you use Configuration API, setup data will be saved. If you export the website configuration, you’ll find name.settings.yml file with the following content key value.
Configuration API
Configuration API: Creating the Configuration Object
$config = Drupal::config(‘name.settings');
Configuration API: Writting values.
$config->set('key','value');
$config->save();
Configuration API: ????????? ??????.
$config->get('key'); // value.
Configuration API: Deleting data.
$config->delete('key');
$config->save();
Now if you export the website configuration, you’ll find name.settings.yml file with the following content key value.
Hope that this quick tip was useful for you! if you don’t want to spend your time on all these works, just let us know and we’ll do all necessary works on Drupal development for you. Leave your contacts in “Ask Questions” form below, and we’ll get acquainted for an interesting discussion. Wish you good luck and friendship with Drupal.
We Launched a Blog on Web and Business!
High five! We did it! It is an important day in WEB4PRO history.
We had been working on it for one year, and finally, we launched our new blog!
Our Blog is a Place for Your Development
And we are happy to invite everybody for staying here and reading our new articles on web tools, business, marketing, and self-development. We are going to share our news with you here, represent our new products, and provide you only with the most useful things from the Internet world and business development.
Our team aims to make you interested and become your best helper in growing your business success. Here you’ll find the best practices on Drupal, Magento®, and WordPress development, get acquainted with the latest web design trends, learn more about modern technologies, and interesting approaches to running the business and marketing strategy.
Come round and stay with us forever! We promise you’ll not be bored 🙂
Welcome to WEB4PRO blog!
Drush and Drupal Console: Test-Drive
Drush and Drupal Console are the utilities with a command line interface. Both of them drastically speed up website administration and development. After the installation, you’ll have an ability to take the specific actions just entering the command into the terminal window, while the same actions could require several steps in a browser, for example.
Drupal Console works only with Drupal 8, and Drush works with Drupal 6, 7, 8.
We think you should know both of these tools if you will work with Drupal 8.
Comparing Drush and Drupal Console
What can we do using these tools? – Look through the list below.
With Drush you can:
- Download and install Drupal and contributed modules;
- Update Drupal and contributed modules;
- Run updates;
- Clean cash;
- Run CRON and Drupal on a light web server;
- Import, export, and merge configurations;
- Add users and set up the roles for them and access permission for roles;
- Make Drupal backup and recovery;
- Copy database and files to the remote server;
- Make a copy of twig templates.
With Drupal Console you can:
- Generate code for:
— Console commands;
— Content types;
— Controllers;
— Entities;
— Form alter hooks;
— Fields types, field widgets, and output widgets.;
— Images effects;
— Rest resources;
— Services;
— Themes; - Switch the website to the maintenance mode and back;
Run unit tests.
Hope that you are interested and ready to start working. We think that Linux and Mac OS users don’t need telling about terms. But as for Windows users, we’ll recommend them to use Git Bush instead of a standard console. You can download Git for Windows here.This article will be useful for those who has the skills of working with the console. So let’s open our console!
Working with Drush and Drupal Console
Drush and Drupal Console are very similar, but they are two different packages. Therefore they should be installed separately:
After the installation of packages, make sure that you did everything correctly. Enter Drush version and Drupal version in a console for this. Then you’ll see something like the information showed below. The numbers of versions could be different in your system.
<div class="half-left">
  <p><strong>Drush</strong></p>
  <p>$ drush version<br>Drush Version : 8.0-dev</p>
</div>
Drupal Console
$ drupal --version
Drupal Console version 0.9.1
Now let’s show the power of Drush in Drupal Console using them together. First of all, we’ll use Drush for Drupal 8 download, installation, and run via pm-download (dl) and quick-drupal (qd) commands.
$ drush dl drupal-8.0.x
Project drupal (8.0.x-dev) downloaded to /Users/ga/tmp/intro-drush/drupal-8.0.x-dev.
Project drupal contains:
- 1 profile: standard
- 13 themes: …
- 62 modules: …
$ cd drupal-8.0.x
$ drush qd --use-existing --uri=http://localhost:8383 --profile=standard
You are about to DROP all tables in your ‘…/drupal-8.0.x-dev.sqlite’ database. Do you want to continue? (y/n): y
Starting Drupal installation. This takes a while. Consider using the --notify global option.
Installation complete.  User name: admin  User password: …
Congratulations, you installed Drupal!
Caching 'uri' localhost:8383 in …/drush/drushrc.php
HTTP server listening on localhost, port 8383 (see http://localhost:8383/), serving site localhost:8383, logged in as admin...
PHP 5.6.12 Development Server started at Thu Sep 24 15:02:53 2015
Listening on http://localhost:8383
Document root is …/drupal-8.0.x-dev
Press Ctrl-C to quit.
After you have seen the message in the terminal shown above, it should be a little pause, and the browser will open the just installed Drupal website in few seconds. Quickly and simply!
Then we’ll use Drupal Console for creating the module for Drupal 8. Type the commands shown below in the terminal.
$ drupal generate:module
Welcome to the Drupal module generator
Enter the new module name: hello
Enter the module machine name [hello]: hello
Enter the module Path [/modules/custom]: /modules/custom
Enter module description [My Awesome Module]: Hello World
Enter package name [Other]: Other
Enter Drupal Core version [8.x]: 8.x
Do you want to add a composer.json file to your module [no]? yes
Would you like to add module dependencies [no]? no
Do you confirm generation [yes]? yes
Generated or updated files
Site path: …/drupal-8.0.x-dev
1 - modules/custom/bello/bello.info.yml
2 - modules/custom/bello/bello.module
Perhaps, you thought that you knew how to develop modules for Drupal 8, didn’t you? In any case, you have just created module via Drupal Console using only one single command. It’s cool, but the module lacks its own controller. And the module without the controller in Drupal 8 is just like a module without hook_menu() for Drupal 7. So, let’s go on and make our module do something. We are going to use the features of Drupal Console again:
$ drupal generate:controller
Welcome to the Drupal Controller generator
Enter the module name: hello
Enter the Controller class name [DefaultController]: HelloController
Controller title: Hello World
Enter the action method name [index]: greet
Enter the route path [hello/greet/{param_1}/{param_2}]: hello/greet/{world}
Controller title (empty to start with code generation):
Do you want to generate a unit test class [yes]? yes
Do you want to load services from the container [no]? no
Do you confirm generation [yes]? yes
Generated or updated files
Site path: …/drupal-8.0.x-dev
1 - modules/custom/hello/src/Controller/HelloController.php
2 - modules/custom/hello/hello.routing.yml
3 - modules/custom/hello/Tests/Controller/HelloControllerTest.php
[ ] Rebuilding routes, wait a moment please
[ ] Done rebuilding route(s).
Controller generation successfully completed. Let’s look what it generated for us:
$ tree modules/custom/
modules/custom/
??? hello
   ??? Tests
   ?   ??? Controller
   ?   	??? HelloControllerTest.php
   ??? composer.json
   ??? hello.info.yml
   ??? hello.module
   ??? hello.routing.yml
   ??? src
       ??? Controller
           ??? HelloController.php
Open HelloController.php file in your favorite editor and replace the things transmitted to a function t() with the data shown in the example below.
class HelloController extends ControllerBase {
 /**
  * Greet.
  *
  * @return string
  *   Return Hello string.
  */
 public function greet($world) {
   return [
       '#type' => 'markup',
       '#markup' => $this->t('Hello, @world!', array('@world' => $world))
   ];
 }
}
Now it looks like the right Hello World module. Let’s turn it on using Drush.
$ drush en hello
The following extensions will be enabled: hello
Do you really want to continue? (y/n): y
hello was enabled successfully.
As you can see, it’s pretty simple to manage Drupal and generate code using Drush and Drupal Console. And these powerful tools can become your best friends while working on Drupal 8. If you need any help on Drupal development, we’ll do these works for you with great pleasure. Just fill “Ask Questions” form below, and we’ll contact you.
Arg Function: How to Replace It in Drupal 8
Arg function was excluded from Drupal 8. But you can replace it simply.
We have url /node/1
Arg Function in Drupal 7
On Drupal 7 we used it in such way:
echo arg(0); // node
echo arg(1); // 1
Arg Function in Drupal 8
In Drupal 8 we use OOP replacement of this function:
$route_match = Drupal::routeMatch()->getParameter('node');

Drupal::routeMatch()->getParameter('node')
Returns the processed value of the “node” route.
As the result, we have an object, from which we can get not only node id but also fields of a node. For example:
$node_id = $route_match->id(); // We’ve got node id (1)
$node_bundle = $route_match->bundle(); // We’ve got bundle nodes (article).
You may find the following example of function replacement in Drupal 8 on the Internet:
$path_args = explode('/', current_path());
echo $path_args[0]; // node
echo $path_args[1]; // 1
In such case of use, we can catch an error with empty or not existing elements.
That’s why, it’s better to use OOP variant of function replacement, which is suggested by the official drupal.org resource. That’s all. Simply and quickly 🙂 But if you have any difficulties, please, contact us and we’ll save your time and do everything related to Drupal development and customization for you.
Form_state in Drupal 7 and Drupal 8
Drupal 7 uses hook form(), form validate(), form submit() hooks for creation, validation, and submission of the form. $form_state array is used for getting values of the filled fields. And today we are going to tell the difference between form_state in Drupal 7 and Drupal 8.
Here is how it works in Drupal 7:
// Get the field value
echo $form_state['values']['field_id'];
// Get all values of the form
$values = $form_state['values'];
As Drupal 8 is completely based on OOP, the form is an entity here. So, forms are classes (OOP), which are created, implementing an interface:
DrupalCoreFormFormBuilderInterface.
There are several abstract form classes for different tasks in Drupal 8 core, which you should base on while subclassing:
- ConfigFormBase – for creating the forms with settings;
- ConfirmFormBase – a form for the confirmation;
- FormBase – the base class for all other form types.
All data, which the user entered while filling the form, will be in a $form_state variable. But $form_state is an entity in Drupal 8, so you should use the following code to get the necessary field value:
// field_id - name of the form element (a key).
echo $form_state->getValue('field_id');
Use the following method for getting all values:
// Get all form values
$values = $form_state->getValues();
That’s the way it works. We hope it’s helpful for you, but nevertheless, if you need any help, contact us, and we’ll do all necessary work on Drupal development for you.
How to Replace Theme() Function in Drupal 8
Have you already worked with Drupal 8? If yes, this post could be useful for you. Sooner or later almost any web developer faces the surprise: theme() function is not included in Drupal 8. And those who is going to try a new Drupal 8 platform should be ready for changes. Today we’ll cope with this and find another effective and useful way.
Let me introduce a bit of history.
Theme () Function
Drupal 7 includes the theme() function. It is responsible for wrapping fields and the other outputting data in some HTML. theme() is pretty useful in many cases: it can theme the output of standard tables, menus, fields, breadcrumbs, etc.
But what to do without it in Drupal 8? Now I’m going to share one useful way of how to act in this case and replace theme() in Drupal 8. Here we go!
Let’s Look at Drupal 7 Theme() Function
In Drupal 7, we can override all theme() functions at the level of your module.
The function could be overridden by adding another function with similar input parameters but the changed name (usually module name instead of theme_) into your module code.
A name of the theme (for example, ‘socbutt_buttons’) and an associative array of variables for transferring to hook_theme() are transferred into this function as parameters.
Here is how it works in Drupal 7:
echo theme('socbutt_buttons', array('layout' => SOCBUTT_LAYOUT_VERTICAL));
/**
* Implements hook_theme().
*/
function socbutt_theme() {
 return array(
   'socbutt_buttons' => array(
     'variables' => array(
       'layout' => SOCBUTT_LAYOUT_VERTICAL,
     ),
   ),
 );
}
function theme_socbutt_buttons($variables) {
	// Here is the code, which defines the look of things we want to display.
…
	// The array for displaying.
	return $output;
}
What About Drupal 8 Theme() Function?
The theme() function has been removed in Drupal 8. So you need to create a renderable array for theming required element. It is a data array which then is transmitted to the render() function.
Let’s do it in Drupal 8:
$items_array = array(
 '#theme' => 'theme_name',
 '#items' => $items;
);
echo Drupal::service('renderer')->render($items_array);
There you are! It’s an effective solution, which will help you to cope with your tasks without theme() and make the work with Drupal 8 more convenient.
Hope that this quick tip was useful for you and we’ll be glad to know your suggestions on this topic. Good luck to you! If you need any help, please contact us and we’ll do all these things on Drupal development.
WordPress Option Fields with Multiple Values
Many of you have already faced a question – “how to create a custom settings page in WP administration area?”, and Google is pleased to offer a dozen of good articles that clearly explain how to declare a list of custom fields on a separate (additional) page in admin area. But what if we need several different links. How to do this?
For example, these fields could be:
- with the “copyright” text;
- mailing address;
- phone number;
- text for you custom HTML-block;
- social links.
And just by the example of the last item in the list a solution for the question in this article – additional options page with social links, will be considered.
The number of links may be a dozen or more. And placing the options page all the ten fields at once (facebook, google , twitter, Instagram, etc.) will be at least not rationally – because not all these fields are necessary for our website. And what if we need two different links on Facebook or more? jQuery WordPress Settings API will be used as the solution. The implementation will consist of the following things: from a list of known social networks you can select the desired option with the social network name and add an instance for referring to the settings form. It will look something like this:

Within this article we’ll not go into details of working with WP Settings API, you can read the official documentation and examples here. We used the example 2 of this source to build a page with social network URL fields.
A class for our page with social network URL fields looks the following way:
<?php
/**
* WP Theme Options
*
* @link http://codex.wordpress.org/Shortcode_API
*
* @package WordPress
* @subpackage WP-Theme
*/
/**
* Class WPThemeSettingsPage
*/
class WPThemeSettingsPage {
  /**
   * Holds Social profiles. You can add more in __construct() function.
   *
   * @var array
   */
  public $social = array();
  /**
   * Holds the values to be used in the fields callbacks
   *
   * @var $options
   */
  private $options;
  /**
   * Start up
   */
  public function __construct() {
     $this->social = array(
        'facebook' => __( 'Facebook' ),
        'twitter' => __( 'Twitter' ),
        'googleplus' => __( 'Google ' ),
        'instagram' => __( 'Instagram' ),
        'linkedin' => __( 'LinkedIn' ),
     );
     add_action( 'admin_menu', array( $this, 'add_plugin_page' ) );
     add_action( 'admin_init', array( $this, 'page_init' ) );
  }
  /**
   * Add options page
   */
  public function add_plugin_page() {
     // This page will be under "Settings".
     add_theme_page(
        __( 'Theme Options' ),
        __( 'Theme Options' ),
        'manage_options',
        'theme_options',
        array( $this, 'create_theme_options_page' )
     );
  }
  /**
   * Options page callback
   */
  public function create_theme_options_page() {
     // Set class property.
     $this->options = array( 'wp_social_profiles' => get_option( 'wp_social_profiles' ) ); ?>
     <div class="wrap">
        <!-- <h2>My Settings</h2> -->
        <form method="post" action="options.php">
           <?php
           // This prints out all hidden setting fields.
           settings_fields( 'wp_options_group' );
           do_settings_sections( 'theme_options' );
           submit_button();
           ?>
        </form>
     </div>
  <?php
  }
  /**
   * Register and add settings
   */
  public function page_init() {
     register_setting(
        'wp_options_group', /* Option group */
        'wp_social_profiles', /* Option name */
        array( $this, 'sanitize_profiles' ) /* Sanitize */
     );
     add_settings_section(
        'setting_section_id', /* ID */
        __( 'WP Theme Options' ), /* Title */
        array( $this, 'print_section_info' ), /* Callback */
        'theme_options' /* Page */
     );
     add_settings_field(
        'wp_social_profiles', /* ID */
        __( 'Social Profiles' ), /* Title */
        array( $this, 'social_profile_callback' ), /* Callback */
        'theme_options', /* Page */
        'setting_section_id' /* Section */
     );
  }
  /**
   *     /**
   * Sanitize each setting field as needed.
   *
   * @param array $input Contains all settings fields as array keys.
   * @return array
   */
  public function sanitize_profiles( $input ) {
     $new_input = array();
     // Sanitize Social Profiles values.
     foreach ( (array) $input as $name => $element ) {
        foreach ( $element as $index => $value ) {
           if ( ! empty( $value ) ) {
              $new_input[ $name ][ $index ] = esc_url( $value );
           }
        }
     }
     return $new_input;
  }
  /**
   * Print the Section text
   */
  public function print_section_info() {
     esc_html_e( 'Enter your settings below:' );
  }
  /**
   * Get the settings option array and print one of its values
   */
  public function social_profile_callback() {
     if ( ! empty( $this->options['wp_social_profiles'] ) ) {
        foreach ( (array) $this->options['wp_social_profiles'] as $name => $element ) {
           foreach ( $element as $index => $value ) { ?>
              <div class="wp-social-profile">
                 <label for="wp_social_profiles_<?php echo esc_attr( $name ); ?>_<?php echo esc_attr( $index ); ?>" class="wp-option-label">
                    <?php echo esc_html( $this->social[ $name ] ); ?>:
                 </label>
                 <input
                    type="text"
                    id="wp_social_profiles_<?php echo esc_attr( $name ); ?>_<?php echo esc_attr( $index ); ?>"
                    name="wp_social_profiles[<?php echo esc_attr( $name ); ?>][]"
                    class="<?php echo esc_attr( $name ); ?>"
                    value="<?php echo esc_attr( $value ); ?>"
                    placeholder="<?php esc_attr_e( 'http://' ); ?>"
                 />
                 <button class="button wp-social-remove"><b>–</b></button>
              </div>
              <?php
           }
        }
     } else { ?>
        <div class="wp-social-profile">
           <label for="wp_social_profiles_facebook_1" class="wp-option-label"><?php echo esc_html( $this->social['facebook'] ); ?>:</label>
           <input
              type="text"
              id="wp_social_profiles_facebook_1"
              name="wp_social_profiles[facebook][]"
              class="facebook"
              value=""
              placeholder="<?php esc_attr_e( 'http://' ); ?>"
           />
           <button class="button wp-social-remove">-</button>
        </div>
        <?php  } ?>
     <hr>
     <div class="wp-social-profile-selector-wrapper">
        <label for="social_profile_selector" class="wp-option-label"><?php esc_attr_e( 'Select profile: ' ); ?></label>
        <select id="social_profile_selector">
           <?php
           foreach ( $this->social as $name => $option ) { ?>
              <option <?php selected( $name, 'facebook' ); ?> value="<?php echo esc_attr( $name ); ?>"><?php echo esc_html( $option ); ?></option>
           <?php } ?>
        </select>
        <button id="social_profile_add" class="button">Add new...</button>
     </div>
     <?php
  }
}
if ( is_admin() ) {
  $settings_page = new WPThemeSettingsPage();
}
function load_option_page_style() {
  wp_register_script( 'wptheme-options-script', get_template_directory_uri() . '/inc/js/theme_options.js', array( 'jquery' ), '1.0.0', true );
  wp_enqueue_script( 'wptheme-options-script' );
}
add_action( 'admin_enqueue_scripts', 'load_option_page_style' );
And JS, which allows us to add/ remove fields:
// Remap jQuery to $.
(function ($) {
  // Re-index profiles.
  function RefreshProfilesIndex(selector) {
     $(document).find("[id^=social_profile_"   selector   "]").each(function (index) {
        $(this).attr('id', 'social_profile_'   selector   '_'   (index));
        $(this).closest('div').find('label').attr('for', 'social_profile_'   selector   '_'   (index));
     });
  }
  // Capitalize first letter on string.
  function toTitleCase(str) {
     return str.replace(/wS*/g, function (txt) {
        return txt.charAt(0).toUpperCase()   txt.substr(1).toLowerCase();
     });
  }
  // Update Events.
  function RefreshEventListener() {
     // Remove handler from existing elements
     $("button.wp-social-remove").off();
     // Re-add event handler for all matching elements
     $("button.wp-social-remove").on("click", function (event) {
        event.preventDefault();
        var selected = $(event.target).parent('div').find('input').attr('class');
        $(event.target).parents('div.wp-social-profile').css('visibility', 'hidden').slideUp("normal", function () {
           $(this).remove();
           RefreshProfilesIndex(selected);
        });
     });
  }
  // Select options toggle refresh.
  function RefreshSelectOptions(target_id) {
     if (target_id === undefined) {
        var $target = $(document).find("select.select-toggle option");
     } else {
        var $target = $(document).find("#"   target_id).closest("form").find("select.select-toggle option");
     }
     $target.on("mousedown", function () {
        var $self = $(this);
        if ($self.prop("selected"))
           $self.prop("selected", false);
        else
           $self.prop("selected", true);
        return false;
     });
  }
  /* trigger when page is ready */
  $(document).ready(function () {
     RefreshEventListener();

     $("#social_profile_add").on("click", function (event) {
        event.preventDefault();

        var selected = $("#social_profile_selector").val();
        var count = parseInt($(document).find("[id^=wp_social_profiles_"   selected   "]").length);
        var $clone = $(document).find(".wp-social-profile").first().clone();

        $clone = $('<div>').addClass("wp-social-profile");
        $clone.html(
           '<label for="wp_social_profiles_'   selected   '_1" class="wp-option-label">'   toTitleCase(selected)   ':</label>'
           '<input '
              'type="text" id="wp_social_profiles_'   selected   '_1" '
              'name="wp_social_profiles['   selected   '][]" '
              'class="'   selected   '" '
              'value="" '
              'placeholder="http://" />'
           '<button class="button wp-social-remove"><b>-</b></button>');
        $clone.insertBefore($(document).find(".wp-social-profile-selector-wrapper").prev()).hide().css({visibility: 'hidden'}).slideDown("normal", function () {
           $(this).css('visibility', 'visible');
        });
        RefreshEventListener();
     });
     RefreshSelectOptions();
  });
  $(".widget-control-save").on("click", function (event) {
     setTimeout(function () {
        RefreshSelectOptions(event.target.id)
     }, 500);
  });
}(window.jQuery || window.$));
Let’s consider the code shown above.
As you can see, the fields are stored as an associative array where the links are grouped by social network title. To let the WP Settings API preserve values from input in the form as array, you should specify the attribute name using the following format:
<input name=wp_social_profiles[facebook][] value=”http://facebook.com/” />
<input name=wp_social_profiles[twitter][] value=”http://twitter.com/” />
<input name=wp_social_profiles[twitter][] value=”http://twitter.com/helloworld” />
<input name=wp_social_profiles[googleplus][] value=”http://googleplus.com/” />
<input name=wp_social_profiles[linkedin][] value=”http://linkedin.com/” />
The key point is the suffix [] in the attribute name. After submitting the form setting with fields in the format, as above, we get an associative array from function get_options( “wp_social_profiles”), such as in the picture above.
If we consider our settings page class more carefully, we declare a “social” array in the construct method:
$this->social = array(
  'facebook' => __( 'Facebook' ),
  'twitter' => __( 'Twitter' ),
  'googleplus' => __( 'Google ' ),
  'instagram' => __( 'Instagram' ),
  'linkedin' => __( 'LinkedIn' ),
);
We’ll route the array with a frontage circle that’s why it could be added among the other social networks. The format is the following: the key of the array element is something like a slug of the social network, and the element value is a header field which we use to display the Preferences page:

JS-script shown in the example above implements the events: delete, and create a new DOM-element on the form, and recalculates the id and for attributes for label and input elements.
It was a quick tip, and we’ll be happy if it’s useful for you. If you have any difficultness with it, contact us and we’ll make it work. Save your time and trust us your WordPress based website!
How to Create Custom TWIG-Filter in Drupal 8
In Drupal 8 templating passed from commonly-used PHP Template to a new and progressive Twig templating engine long ago. Let’s learn how to create custom Twig-filters in Drupal 8.
In Twig templates, we can’t use traditional PHP-functions, and the syntax is also generally different. In Twig templates filters are used as a replacement for the functions. Filters are designated with a “pipe” symbol – “|”:
{{ data|filter() }}or with additional arguments:
{{ data|filter(arg2, arg3) }}Where “data” variable is the first argument of the filter, and the arguments in brackets are the second, the third, etc.
Twig Filters
Twig has a standard set of filters. You can familiarize yourself with them in the official documentation – http://twig.sensiolabs.org/doc/filters/index.html
But what if we need our own Twig-filter in Drupal 8, or in PHP language – a custom function? To do this, we need our custom module to declare the service – “twig_service” and prepare class which describes its functionality.
As an example, let’s set the task: create Twig-filter with currency conversion. Google Currency Converter API will be used for the conversion. We will send a request with required amount and currency. In response, we will get the result of the conversion according to the latest exchange rates.
Thus, we need to transfer three parameters to the filter:
- the sum (amount);
- original currency (curr_from);
- target currency (curr_to).
That’s how the filter call will look:
{{ amount|filter(curr_from, curr_to) }}Let’s define what we need to prepare for the demonstration of twig-filter creation. First of all, we need to create a custom module. How to do this can be found here. I have prepared a module called twig_filter. The module defines route and page controller, also defines twig-pattern and transfers the required for the filter parameters to the template.
Module file list
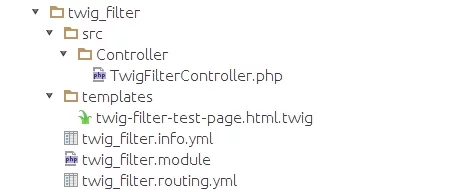
The module’s declaration file twig_filter.info.yml:
name: Twig Filter Test
type: module
description: 'Twig Filter Demonstration'
package: customs
version: '8.x'
core: '8.x'
project: 'twig_filter'
Route declaration file twig_filter.routing.yml:
twig_filter.result:
path: '/twig-filter/{curr_from}/{curr_to}/{amount}'
defaults:
  _controller: 'Drupaltwig_filterControllerTwigFilterController::testTwigPage'
  _title: 'Twig filter Page'
requirements:
  _permission: 'access content'
Controller Class file TwigFilterController.php:
<?php
/**
* @file
* Contains Drupaltwig_filterControllerTwigFilterController.
*/
namespace Drupaltwig_filterController;
use DrupalCoreControllerControllerBase;
/**
* Class TwigFilterController.
*
* @package Drupaltwig_filterController
*/
class TwigFilterController extends ControllerBase {
/**
 * {@inheritdoc}
 */
public function testTwigPage($curr_from, $curr_to, $amount) {
  // Construct element and it's data.
  $element = array(
    '#theme' => 'twig_filter_test_page',
    '#curr_from' => $curr_from,
    '#curr_to' => $curr_to,
    '#amount' => $amount,
  );
  return $element;
}
      }
Twig-template file twig-filter-test-page.html.twig
(Explanation of the filter use):
<div>
  <h4>{% trans %}Google Currency API response results: {% endtrans %}</h4>
  {{ amount|currency(curr_from, curr_to) }}
</div>
Module functions File twig filter.module:
<?php
/**
* Implements hook_theme().
*/
function twig_filter_theme($existing, $type, $theme, $path) {
return [
  'twig_filter_test_page' => [
    'render element' => 'twig_filter_test_page',
    'path' => $path . '/templates',
    'template' => 'twig-filter-test-page',
    'variables' => [
      'curr_from' => NULL,
      'curr_to' => NULL,
      'amount' => NULL,
    ],
  ],
];
      }
Next, when we already have a module that defines a new route and page controller, we need to realize the following tasks:
- declare twig_service module service;
- create a class, which will describe the implementation of the functional Twig-filter.
To declare a service in the module, you need to create a file [module_name].services.yml. In my case, it will be twig_filter.services.yml:

Write the following in the twig filter.services.yml file:
services:
  twig_filter.twig.twig_extension:
      class: Drupaltwig_filterTwigCurrencyTwigExtention
      public: false
      tags:
- { name: twig.extension }
Where we specify the file with twig-filter functionality class.
Now you should only create a class file that specifies the service.
In the “src” folder, which should be located in the root directory of the module, create “Twig” folder, and then create a file named CurrencyTwigExtention.php. We have the following structure of the module file:
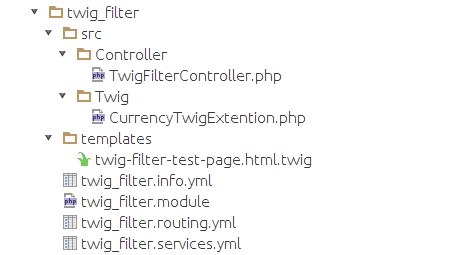
We make CurrencyTwigExtension.php file:
/**
* Class CurrencyTwigExtention.
*
* @package Drupaltwig_filterTwig
*/
class CurrencyTwigExtention extends Twig_Extension {
/**
 * Filter call.
 *
 * @return array|Twig_SimpleFilter[]
 */
public function getFilters() {
  return array(
    new Twig_SimpleFilter('currency', array($this, 'currencyCalcFilter')),
  );
}
/**
 * Use Google Currency Converter API.
 *
 * @param int $amount
 *    Amount.
 * @param string $curr_from
 *    From currency.
 * @param string $curr_to
 *    To currency.
 *
 * @return mixed
 *    API response.
 */
public function currencyCalcFilter($amount, $curr_from = 'USD', $curr_to = 'EUR') {
  $url = "http://www.google.com/finance/converter?a={$amount}&from={$curr_from}&to={$curr_to}";
  $request = curl_init();
  $timeOut = 100;
  curl_setopt($request, CURLOPT_URL, $url);
  curl_setopt($request, CURLOPT_RETURNTRANSFER, 1);
  curl_setopt($request, CURLOPT_USERAGENT, "Mozilla/4.0 (compatible; MSIE 8.0; Windows NT 6.1)");
  curl_setopt($request, CURLOPT_CONNECTTIMEOUT, $timeOut);
  $response = curl_exec($request);
  curl_close($request);
  preg_match("/<div id=currency_converter_result>(.*)<span class=bld>(.*)</span>/", $response, $converted);
  $output = array(
    '#type' => 'markup',
    '#markup' => sprintf("<div>%s</div>", implode('', [$converted[1], $converted[2]])),
  );
  return $output;
}
/**
 * Get filter name.
 *
 * @return string
 *    Filter name.
 */
public function getName() {
  return 'twig_filter.twig_extension';
}
        }
When using |currency Twig-filter, currencyCalcFilter() the method tethered to it is called, in which we make HTTP-request to Google currency converter API with the required parameters. And then we cut out the useful text from the reply with a regular expression and give the results via a build-container for rendering content.
If you did everything right, when after navigating /twig-filter/USD/UAH/1500 page, we get the following result:

Don’t forget to clear the cache after changes in the twig templates or module code.
We hope this article was useful for you, and you are ready to create a custom filter. But if you need some help, feel free to contact us and we’ll solve your issues related to Drupal development.