Debugging Magento 2 Using Logs
When working with Magento 2, sections of code are often processed unexpectedly. When this happens, developers need to understand the reason for the error and fix it.
Log files are convenient for debugging. In most cases, they help you quickly determine the cause of the error and fix it. In this article, we will examine the types of log files and the specifics of working with them.
Using Logs: Magento 2 Live Site Example
Let’s assume we’re working with a site on Magento 2 that is in production mode (the main “live” mode of Magento 2 sites) and is running on a UNIX-like OS.
Types of Logs
There are two types of logs available to developers: information logs and error logs. An information log can hold information a developer needs for debugging, while error logs hold information about runtime errors. The main information log is saved in your Magento 2 directory: var/log/system.log.
Types of Errors
There are three types of errors:
- handled exceptions,
- non-handled exceptions, and
- fatal runtime errors.
We will consider each of these error types.
Magento 2 has a Psr logging library that implements embedded logging. To log something, you simply have to call the interface Psr\Log\LoggerInterface, which will be implemented using dependency injection of the class Magento\Framework\Logger\Monolog (the dependency is defined in the global app/etc/di.xml).
The interface declares several logging methods, and the class implements them. These methods differ only in terms of the additional information about critical messages shown in the log. The models inherited from AbstractModel, block collections, and helpers have a protected _logger property that can be used for logging. For all remaining classes, you can log using dependency injection in the constructor or using ObjectManager. In the examples below, we will assume that the class has _logger property.
The Principles of Magento Logging
Logging is simple. You just need to call $this->_logger->info(param), where param is some scalar variable that will be logged in the file var/log/system.log.
Calling the error or critical methods will write a scalar variable to this same file. If you pass an object of the class inherited from \Exception as a parameter, then the error will be logged in the file var/log/exception.log. In versions 2.0 and 2.1, the exception’s full trace was recorded to this file, making it possible to easily determine the location of the error and a way to fix it. But starting in version 2.2, only the exception message and the place where it was thrown are recorded.
To get the trace, you need to write $this->_logger->critical($e->_toString());, but the error and trace will be recorded in the file var/log/system.log. Nevertheless, this is convenient when you need to determine the full path to the location where the error occurred and also determine the current values of various parameters in order to understand the reason for the error. Exceptions can only be logged in the catch block of the construct.
try{
..}
catch(\Exception $e){
 $this->_logger->critical($e->__toString());
..}.
If the developer didn’t use exception handling, then sometimes this handling is already implemented at the core level, in particular when outputting blocks.
When an exception occurs when a block’s content is generated, the block will not be displayed, and a message about the error will be displayed in the file var/log/exception.log. Otherwise, if the exception is intercepted by a top-level handler, the server will return an error and the exception will be logged in a separate file in the directory var/report. If the error occurred when processing an API request, the error will be logged in a separate file in the directory var/report/api.
The cases above considered errors that Magento could process. But if a fatal error occurs when executing code, Magento will not be able to process it, and the error will go to the Web server log. Next, we will look at examples of fatal errors, where they appear, and why they appear.
Fatal Errors and the Reasons Behind Them
By default, these files are located in the server’s /var/log directory, with the rest of the path determined by the type of server (Apache, NGINX, PHP-FPM) and configuration features. On live servers (and others) developers often do not have the data in these directories for security reasons, or the server administrator may redirect logging of fatal errors to other files, which will be available. This is often done if several virtual hosts are implemented on one physical server and access to the hosts is limited to certain users.
Sometimes this log is available in Cpanel, if it is supported by the hosting. Since these errors are fatal, the HTTP request will return a 50x error. These types of errors can occur at the PHP level; they can be caused by insufficient memory allotted to runtime or insufficient disk space; and they can also occur at the Apache or NGINX level. One common error of this kind at the NGINX level is be caused by a connection timeout or buffer overflow, which can only be resolved by changing NGINX settings.
There are often redirect errors at the server level as well, which return 404 server errors. There are other types of 40x errors as well, such as transferring more to POST than the server can handle, but that’s a separate topic.
Let’s summarize what we’ve gone over so far.
- If the executed code isn’t working as expected, you should first check the Magento logs. More often than not, it’s easy to establish the reason for the error from these logs.
- If requests to the server return 40x or 50x errors, you should check the var/report directory and the Web server log, if possible.
- When debugging code, log critical variables and check their values.
- If existing core code isn’t writing all the necessary information to the log (this usually has to do with error handling) then when you are debugging and finding out the reason for the error, you can temporarily add logging. Don’t forget to roll back changes to the core, returning it to its original state after debugging.
- In some cases, logs are the only available means of debugging. For example, cron jobs, API requests, and payment methods can usually only be debugged using logs.
- Keep in mind that logs have the tendency to grow, so don’t forget to periodically delete old Magento log files. The automatic deletion of global logs after a certain period of time is usually configured on servers.
- Don’t forget to remove logging of safety-critical information from the code after debugging. This usually pertains to credit card information, but it could be other information as well.
Useful for you:
Real Examples of Using Logs for Debugging
1. Optimizing a site that has seen a sharp increase in front-end page load speeds after upgrading to version 2.3.
This may be caused by conflicts between obsolete site modules and the new core version of Magento. There is speculation that the problem may be related to the generation of a menu in a custom extension. The menu displays categories and uses flat tables. When researching, you were able to establish that category information is received in the _loadNodes method of the \Magento\Catalog\Model\ResourceModel\Category\Flat class.
The method looks as follows:
protected function _loadNodes($parentNode = null, $recursionLevel = 0, $storeId = 0, $skipMenuFilter = false)
{
    $_conn = $this->getConnection();
    $startLevel = 1;
    $parentPath = '';
    if ($parentNode instanceof \Magento\Catalog\Model\Category) {
        $parentPath = $parentNode->getPath();
        $startLevel = $parentNode->getLevel();
    } elseif (is_numeric($parentNode)) {
        $selectParent = $_conn->select()->from(
            $this->getMainStoreTable($storeId)
        )->where(
            'entity_id = ?',
            $parentNode
        )->where(
            'store_id = ?',
            $storeId
        );
        $parentNode = $_conn->fetchRow($selectParent);
        if ($parentNode) {
            $parentPath = $parentNode['path'];
            $startLevel = $parentNode['level'];
        }
    }
    $select = $_conn->select()->from(
        ['main_table' => $this->getMainStoreTable($storeId)],
        [
            'entity_id',
            new \Zend_Db_Expr('main_table.' . $_conn->quoteIdentifier('name')),
            new \Zend_Db_Expr('main_table.' . $_conn->quoteIdentifier('path')),
            'is_active',
            'is_anchor'
        ]
    )->joinLeft(
        ['url_rewrite' => $this->getTable('url_rewrite')],
        'url_rewrite.entity_id = main_table.entity_id AND url_rewrite.is_autogenerated = 1'
        . $_conn->quoteInto(' AND url_rewrite.store_id = ?', $storeId)
        . $_conn->quoteInto(' AND url_rewrite.entity_type = ?', CategoryUrlRewriteGenerator::ENTITY_TYPE),
        ['request_path' => 'url_rewrite.request_path']
    )->where('main_table.is_active = 1');
    if (false == $skipMenuFilter) {
        $select->where('main_table.include_in_menu = ?', '1');
    }
    $select->order('main_table.position');
    if ($parentPath) {
        $select->where($_conn->quoteInto("main_table.path like ?", "{$parentPath}/%"));
    }
    if ($recursionLevel != 0) {
        $levelField = $_conn->quoteIdentifier('level');
        $select->where($levelField . ' <= ?', $startLevel   $recursionLevel);
    }
    $inactiveCategories = $this->getInactiveCategoryIds();
    if (!empty($inactiveCategories)) {
        $select->where('main_table.entity_id NOT IN (?)', $inactiveCategories);
    }
    // Allow extensions to modify select (e.g. add custom category attributes to select)
    $this->_eventManager->dispatch('catalog_category_flat_loadnodes_before', ['select' => $select]);
    $arrNodes = $_conn->fetchAll($select);
    $nodes = [];
    foreach ($arrNodes as $node) {
        $node['id'] = $node['entity_id'];
        $nodes[$node['id']] = $this->_categoryFactory->create()->setData($node);
    }
    return $nodes;
}
Since we need to get the request for debugging and optimization, we can modify this method:
protected function _loadNodes($parentNode = null, $recursionLevel = 0, $storeId = 0, $skipMenuFilter = false)
{
    $_conn = $this->getConnection();
    $startLevel = 1;
    $parentPath = '';
    if ($parentNode instanceof \Magento\Catalog\Model\Category) {
        $parentPath = $parentNode->getPath();
        $startLevel = $parentNode->getLevel();
    } elseif (is_numeric($parentNode)) {
        $selectParent = $_conn->select()->from(
            $this->getMainStoreTable($storeId)
        )->where(
            'entity_id = ?',
            $parentNode
        )->where(
            'store_id = ?',
            $storeId
        );
        $parentNode = $_conn->fetchRow($selectParent);
        if ($parentNode) {
            $parentPath = $parentNode['path'];
            $startLevel = $parentNode['level'];
        }
    }
    $select = $_conn->select()->from(
        ['main_table' => $this->getMainStoreTable($storeId)],
        [
            'entity_id',
            new \Zend_Db_Expr('main_table.' . $_conn->quoteIdentifier('name')),
            new \Zend_Db_Expr('main_table.' . $_conn->quoteIdentifier('path')),
            'is_active',
            'is_anchor'
        ]
    )->joinLeft(
        ['url_rewrite' => $this->getTable('url_rewrite')],
        'url_rewrite.entity_id = main_table.entity_id AND url_rewrite.is_autogenerated = 1'
        . $_conn->quoteInto(' AND url_rewrite.store_id = ?', $storeId)
        . $_conn->quoteInto(' AND url_rewrite.entity_type = ?', CategoryUrlRewriteGenerator::ENTITY_TYPE),
        ['request_path' => 'url_rewrite.request_path']
    )->where('main_table.is_active = 1');
    if (false == $skipMenuFilter) {
        $select->where('main_table.include_in_menu = ?', '1');
    }
    $select->order('main_table.position');
    if ($parentPath) {
        $select->where($_conn->quoteInto("main_table.path like ?", "{$parentPath}/%"));
    }
    if ($recursionLevel != 0) {
        $levelField = $_conn->quoteIdentifier('level');
        $select->where($levelField . ' <= ?', $startLevel   $recursionLevel);
    }
    $inactiveCategories = $this->getInactiveCategoryIds();
    if (!empty($inactiveCategories)) {
        $select->where('main_table.entity_id NOT IN (?)', $inactiveCategories);
    }
    // Allow extensions to modify select (e.g. add custom category attributes to select)
    $this->_eventManager->dispatch('catalog_category_flat_loadnodes_before', ['select' => $select]);
    $logger = \Magento\Framework\App\ObjectManager::getInstance()->get('Psr\Log\LoggerInterface');
    $logger->info($select->__toString());
    $arrNodes = $_conn->fetchAll($select);
    $nodes = [];
    foreach ($arrNodes as $node) {
        $node['id'] = $node['entity_id'];
        $nodes[$node['id']] = $this->_categoryFactory->create()->setData($node);
    }
    return $nodes;
}
Then, after loading the page without the cache in the var/log/system.log file, we see the following message:
[2019-02-04 15:20:25] main.INFO: SELECT `main_table`.`entity_id`, main_table.`name`, main_table.`path`, `main_table`.`is_active`, `main_table`.`is_anchor`, `url_rewrite`.`request_path` FROM `catalog_category_flat_store_1` AS `main_table`
LEFT JOIN `url_rewrite` ON url_rewrite.entity_id = main_table.entity_id AND url_rewrite.is_autogenerated = 1 AND url_rewrite.store_id = ‘1’ AND url_rewrite.entity_type = ‘category’ WHERE (main_table.is_active = 1) AND (main_table.include_in_menu = ‘1’) AND (main_table.path like ‘1/71/%’) ORDER BY `main_table`.`position` ASC
We received a request in the message that we can optimize. If we need to get back-trace, we can get it as follows:
View code:
[2019-02-04 17:43:29] main.ERROR: Exception: SELECT `main_table`.`entity_id`, main_table.`name`, main_table.`path`, `main_table`.`is_active`, `main_table`.`is_anchor`, `url_rewrite`.`request_path` FROM `catalog_category_flat_store_1` AS `main_table`
 LEFT JOIN `url_rewrite` ON url_rewrite.entity_id = main_table.entity_id AND url_rewrite.is_autogenerated = 1 AND url_rewrite.store_id = '1' AND url_rewrite.entity_type = 'category' WHERE (main_table.is_active = 1) AND (main_table.include_in_menu = '1') AND (main_table.path like '1/71/%') ORDER BY `main_table`.`position` ASC
 in /var/www/toshno/vendor/magento/module-catalog/Model/ResourceModel/Category/Flat.php:304
Stack trace:
#0 /var/www/toshno/vendor/magento/module-catalog/Model/ResourceModel/Category/Flat.php(376): Magento\Catalog\Model\ResourceModel\Category\Flat->_loadNodes(Object(Magento\Catalog\Model\Category\Interceptor), 0, '1')
#1 /var/www/toshno/vendor/magento/module-catalog/Model/ResourceModel/Category/Flat.php(433): Magento\Catalog\Model\ResourceModel\Category\Flat->getNodes('71', 0, '1')
#2 /var/www/toshno/vendor/magento/module-catalog/Model/Category.php(970): Magento\Catalog\Model\ResourceModel\Category\Flat->getCategories('71', 0, true, false, true)
#3 /var/www/toshno/generated/code/Magento/Catalog/Model/Category/Interceptor.php(466): Magento\Catalog\Model\Category->getCategories('71', 0, true, false, true)
#4 /var/www/toshno/vendor/magento/module-catalog/Helper/Category.php(115): Magento\Catalog\Model\Category\Interceptor->getCategories('71', 0, true, false, true)
#5 /var/www/toshno/app/code/Magentice/Megamenu/Block/Topmenu.php(60): Magento\Catalog\Helper\Category->getStoreCategories(true, false, true)
#6 /var/www/toshno/app/code/Magentice/Megamenu/Block/Topmenu.php(192): Magentice\Megamenu\Block\Topmenu->getStoreCategories(true, false, true)
#7 /var/www/toshno/app/design/frontend/Magentice/enhanced/Magentice_Megamenu/templates/topmenu.phtml(25): Magentice\Megamenu\Block\Topmenu->getMegamenuHtml()
#8 /var/www/toshno/vendor/magento/framework/View/TemplateEngine/Php.php(59): include('/var/www/toshno...')
#9 /var/www/toshno/vendor/magento/framework/View/Element/Template.php(271): Magento\Framework\View\TemplateEngine\Php->render(Object(Magentice\Megamenu\Block\Topmenu), '/var/www/toshno...', Array)
#10 /var/www/toshno/vendor/magento/framework/View/Element/Template.php(301): Magento\Framework\View\Element\Template->fetchView('/var/www/toshno...')
#11 /var/www/toshno/vendor/magento/framework/View/Element/AbstractBlock.php(668): Magento\Framework\View\Element\Template->_toHtml()
#12 /var/www/toshno/vendor/magento/framework/View/Layout.php(557): Magento\Framework\View\Element\AbstractBlock->toHtml()
#13 /var/www/toshno/vendor/magento/framework/View/Layout.php(533): Magento\Framework\View\Layout->_renderBlock('mg.topnav')
#14 /var/www/toshno/generated/code/Magento/Framework/View/Layout/Interceptor.php(206): Magento\Framework\View\Layout->renderNonCachedElement('mg.topnav')
#15 /var/www/toshno/vendor/magento/framework/View/Layout.php(488): Magento\Framework\View\Layout\Interceptor->renderNonCachedElement('mg.topnav')
#16 /var/www/toshno/generated/code/Magento/Framework/View/Layout/Interceptor.php(193): Magento\Framework\View\Layout->renderElement('mg.topnav', true)
#17 /var/www/toshno/vendor/magento/framework/View/Element/AbstractBlock.php(512): Magento\Framework\View\Layout\Interceptor->renderElement('mg.topnav', true)
#18 /var/www/toshno/vendor/magento/module-theme/view/frontend/templates/html/container.phtml(10): Magento\Framework\View\Element\AbstractBlock->getChildHtml()
#19 /var/www/toshno/vendor/magento/framework/View/TemplateEngine/Php.php(59): include('/var/www/toshno...')
#20 /var/www/toshno/vendor/magento/framework/View/Element/Template.php(271): Magento\Framework\View\TemplateEngine\Php->render(Object(Magento\Framework\View\Element\Template), '/var/www/toshno...', Array)
#21 /var/www/toshno/vendor/magento/framework/View/Element/Template.php(301): Magento\Framework\View\Element\Template->fetchView('/var/www/toshno...')
#22 /var/www/toshno/vendor/magento/framework/View/Element/AbstractBlock.php(668): Magento\Framework\View\Element\Template->_toHtml()
#23 /var/www/toshno/vendor/magento/framework/View/Layout.php(557): Magento\Framework\View\Element\AbstractBlock->toHtml()
#24 /var/www/toshno/vendor/magento/framework/View/Layout.php(533): Magento\Framework\View\Layout->_renderBlock('store.menu')
#25 /var/www/toshno/generated/code/Magento/Framework/View/Layout/Interceptor.php(206): Magento\Framework\View\Layout->renderNonCachedElement('store.menu')
#26 /var/www/toshno/vendor/magento/framework/View/Layout.php(488): Magento\Framework\View\Layout\Interceptor->renderNonCachedElement('store.menu')
#27 /var/www/toshno/generated/code/Magento/Framework/View/Layout/Interceptor.php(193): Magento\Framework\View\Layout->renderElement('store.menu', true)
#28 /var/www/toshno/vendor/magento/module-theme/view/frontend/templates/html/sections.phtml(26): Magento\Framework\View\Layout\Interceptor->renderElement('store.menu')
#29 /var/www/toshno/vendor/magento/framework/View/TemplateEngine/Php.php(59): include('/var/www/toshno...')
#30 /var/www/toshno/vendor/magento/framework/View/Element/Template.php(271): Magento\Framework\View\TemplateEngine\Php->render(Object(Magento\Framework\View\Element\Template), '/var/www/toshno...', Array)
#31 /var/www/toshno/vendor/magento/framework/View/Element/Template.php(301): Magento\Framework\View\Element\Template->fetchView('/var/www/toshno...')
#32 /var/www/toshno/vendor/magento/framework/View/Element/AbstractBlock.php(668): Magento\Framework\View\Element\Template->_toHtml()
#33 /var/www/toshno/vendor/magento/framework/View/Layout.php(557): Magento\Framework\View\Element\AbstractBlock->toHtml()
#34 /var/www/toshno/vendor/magento/framework/View/Layout.php(533): Magento\Framework\View\Layout->_renderBlock('navigation.sect...')
#35 /var/www/toshno/generated/code/Magento/Framework/View/Layout/Interceptor.php(206): Magento\Framework\View\Layout->renderNonCachedElement('navigation.sect...')
#36 /var/www/toshno/vendor/magento/framework/View/Layout.php(488): Magento\Framework\View\Layout\Interceptor->renderNonCachedElement('navigation.sect...')
#37 /var/www/toshno/generated/code/Magento/Framework/View/Layout/Interceptor.php(193): Magento\Framework\View\Layout->renderElement('navigation.sect...', true)
#38 /var/www/toshno/vendor/magento/framework/View/Element/AbstractBlock.php(508): Magento\Framework\View\Layout\Interceptor->renderElement('navigation.sect...', true)
#39 [internal function]: Magento\Framework\View\Element\AbstractBlock->getChildHtml('navigation.sect...')
#40 /var/www/toshno/vendor/magento/framework/View/TemplateEngine/Php.php(82): call_user_func_array(Array, Array)
#41 /var/www/toshno/app/design/frontend/Magentice/enhanced/Magentice_Enhanced/templates/html/header.phtml(357): Magento\Framework\View\TemplateEngine\Php->__call('getChildHtml', Array)
#42 /var/www/toshno/vendor/magento/framework/View/TemplateEngine/Php.php(59): include('/var/www/toshno...')
#43 /var/www/toshno/vendor/magento/framework/View/Element/Template.php(271): Magento\Framework\View\TemplateEngine\Php->render(Object(Magentice\Enhanced\Block\Template), '/var/www/toshno...', Array)
#44 /var/www/toshno/vendor/magento/framework/View/Element/Template.php(301): Magento\Framework\View\Element\Template->fetchView('/var/www/toshno...')
#45 /var/www/toshno/vendor/magento/framework/View/Element/AbstractBlock.php(668): Magento\Framework\View\Element\Template->_toHtml()
#46 /var/www/toshno/vendor/magento/framework/View/Layout.php(557): Magento\Framework\View\Element\AbstractBlock->toHtml()
#47 /var/www/toshno/vendor/magento/framework/View/Layout.php(533): Magento\Framework\View\Layout->_renderBlock('enhanced_header')
#48 /var/www/toshno/generated/code/Magento/Framework/View/Layout/Interceptor.php(206): Magento\Framework\View\Layout->renderNonCachedElement('enhanced_header')
#49 /var/www/toshno/vendor/magento/framework/View/Layout.php(488): Magento\Framework\View\Layout\Interceptor->renderNonCachedElement('enhanced_header')
#50 /var/www/toshno/generated/code/Magento/Framework/View/Layout/Interceptor.php(193): Magento\Framework\View\Layout->renderElement('enhanced_header', false)
#51 /var/www/toshno/vendor/magento/framework/View/Layout.php(585): Magento\Framework\View\Layout\Interceptor->renderElement('enhanced_header', false)
#52 /var/www/toshno/vendor/magento/framework/View/Layout.php(535): Magento\Framework\View\Layout->_renderContainer('page.wrapper', false)
#53 /var/www/toshno/generated/code/Magento/Framework/View/Layout/Interceptor.php(206): Magento\Framework\View\Layout->renderNonCachedElement('page.wrapper')
#54 /var/www/toshno/vendor/magento/framework/View/Layout.php(488): Magento\Framework\View\Layout\Interceptor->renderNonCachedElement('page.wrapper')
#55 /var/www/toshno/generated/code/Magento/Framework/View/Layout/Interceptor.php(193): Magento\Framework\View\Layout->renderElement('page.wrapper', false)
#56 /var/www/toshno/vendor/magento/framework/View/Layout.php(585): Magento\Framework\View\Layout\Interceptor->renderElement('page.wrapper', false)
#57 /var/www/toshno/vendor/magento/framework/View/Layout.php(535): Magento\Framework\View\Layout->_renderContainer('root', false)
#58 /var/www/toshno/generated/code/Magento/Framework/View/Layout/Interceptor.php(206): Magento\Framework\View\Layout->renderNonCachedElement('root')
#59 /var/www/toshno/vendor/magento/framework/View/Layout.php(488): Magento\Framework\View\Layout\Interceptor->renderNonCachedElement('root')
#60 /var/www/toshno/generated/code/Magento/Framework/View/Layout/Interceptor.php(193): Magento\Framework\View\Layout->renderElement('root', true)
#61 /var/www/toshno/vendor/magento/framework/View/Layout.php(954): Magento\Framework\View\Layout\Interceptor->renderElement('root')
#62 /var/www/toshno/vendor/magento/framework/Interception/Interceptor.php(58): Magento\Framework\View\Layout->getOutput()
#63 /var/www/toshno/vendor/magento/framework/Interception/Interceptor.php(138): Magento\Framework\View\Layout\Interceptor->___callParent('getOutput', Array)
#64 /var/www/toshno/vendor/magento/framework/Interception/Interceptor.php(153): Magento\Framework\View\Layout\Interceptor->Magento\Framework\Interception\{closure}()
#65 /var/www/toshno/generated/code/Magento/Framework/View/Layout/Interceptor.php(494): Magento\Framework\View\Layout\Interceptor->___callPlugins('getOutput', Array, Array)
#66 /var/www/toshno/vendor/magento/framework/View/Result/Page.php(258): Magento\Framework\View\Layout\Interceptor->getOutput()
#67 /var/www/toshno/vendor/magento/framework/View/Result/Layout.php(171): Magento\Framework\View\Result\Page->render(Object(Magento\Framework\App\Response\Http\Interceptor))
#68 /var/www/toshno/vendor/magento/framework/Interception/Interceptor.php(58): Magento\Framework\View\Result\Layout->renderResult(Object(Magento\Framework\App\Response\Http\Interceptor))
#69 /var/www/toshno/vendor/magento/framework/Interception/Interceptor.php(138): Magento\Framework\View\Result\Page\Interceptor->___callParent('renderResult', Array)
#70 /var/www/toshno/app/code/Potato/Compressor/Plugin/ControllerRenderResultAfter.php(58): Magento\Framework\View\Result\Page\Interceptor->Magento\Framework\Interception\{closure}(Object(Magento\Framework\App\Response\Http\Interceptor))
#71 /var/www/toshno/vendor/magento/framework/Interception/Interceptor.php(135): Potato\Compressor\Plugin\ControllerRenderResultAfter->aroundRenderResult(Object(Magento\Framework\View\Result\Page\Interceptor), Object(Closure), Object(Magento\Framework\App\Response\Http\Interceptor))
#72 /var/www/toshno/vendor/magento/framework/Interception/Interceptor.php(153): Magento\Framework\View\Result\Page\Interceptor->Magento\Framework\Interception\{closure}(Object(Magento\Framework\App\Response\Http\Interceptor))
#73 /var/www/toshno/generated/code/Magento/Framework/View/Result/Page/Interceptor.php(130): Magento\Framework\View\Result\Page\Interceptor->___callPlugins('renderResult', Array, NULL)
#74 /var/www/toshno/vendor/magento/framework/App/Http.php(139): Magento\Framework\View\Result\Page\Interceptor->renderResult(Object(Magento\Framework\App\Response\Http\Interceptor))
#75 /var/www/toshno/generated/code/Magento/Framework/App/Http/Interceptor.php(24): Magento\Framework\App\Http->launch()
#76 /var/www/toshno/vendor/magento/framework/App/Bootstrap.php(258): Magento\Framework\App\Http\Interceptor->launch()
#77 /var/www/toshno/index.php(39): Magento\Framework\App\Bootstrap->run(Object(Magento\Framework\App\Http\Interceptor))
#78 {main} [] []
After analyzing the back-trace code and getting the request, we see that it’s possible to reduce category selection by restricting the level of categories that will be displayed in the menu. We can do this with the parameter of the ‘catalog/navigation/max_depth’ configuration. At the same time, we can optimize the request by adding additional indexes on the index table catalog_category_flat_store_1.
This is possible is because this is an index table and is recreated when the index is rebuilt by the createTable() method of the Magento\Catalog\Model\Indexer\Category\Flat\Action\Full class, while the method getFlatTableStructure() gets the table structure. Unfortunately, both methods are protected, so you can’t apply plugins to them, but you can redefine the indexer class using di.xml:
<preference for="Magento\Catalog\Model\Indexer\Category\Flat\Action\Full" type="Web4pro\All\Model\Indexer\Category\Full"/>

And the class looks as follows:

class Full extends \Magento\Catalog\Model\Indexer\Category\Flat\Action\Full
{
    protected function getFlatTableStructure($tableName)
    {
        $table = parent::getFlatTableStructure($tableName);
        $table->addIndex('category_active_parent_id',array('is_active','parent_id'),array('type'=>'index'));
        $table->addIndex('category_active_menu_level',array('is_active','include_in_menu','level','path'),array('type'=>'index'));
        return $table;
    }
}
After rebuilding the Magento indexes, loading the page without the generated cache significantly sped up. All that remains is to take the logging code that helped solve the problem out of the core files.
2. Migrating a site from Magento 1 to Magento 2. Data was migrated using a migration tool. Products on the Magento 1 site are updated by cron from a CSV file generated by the ERP system. With Magento 1, MAGMI is used for import, but this system can’t be used with Magento 2. Instead of MAGMI, we use the Firebear_ImportExport module, which supports the import of products by cron. The module also supports generating unique SEO URLs for products. However, the cron import task was found to not be ending successfully. When analyzing the exception.log file, the following message about the error was found
View code:
[2019-02-06 08:34:27] main.CRITICAL: URL key for specified store already exists. {"exception":"[object] (Magento\\UrlRewrite\\Model\\Exception\\UrlAlreadyExistsException(code: 0): URL key for specified store already exists. at /home/magento/www/vendor/magento/module-url-rewrite/Model/Storage/DbStorage.php:220, Magento\\Framework\\Exception\\AlreadyExistsException(code: 0): URL key for specified store already exists. at /home/magento/www/vendor/magento/module-url-rewrite/Model/Storage/DbStorage.php:250, Magento\\Framework\\DB\\Adapter\\DuplicateException(code: 1062): SQLSTATE[23000]: Integrity constraint violation: 1062 Duplicate entry 'skinny-charles-3-pc-4803.html-1' for key 'URL_REWRITE_REQUEST_PATH_STORE_ID', query was: INSERT INTO `url_rewrite` (`redirect_type`,`is_autogenerated`,`metadata`,`description`,`entity_type`,`entity_id`,`request_path`,`target_path`,`store_id`) VALUES (?, ?, ?, ?, ?, ?, ?, ?, ?), (?, ?, ?, ?, ?, ?, ?, ?, ?), (?, ?, ?, ?, ?, ?, ?, ?, ?), (?, ?, ?, ?, ?, ?, ?, ?, ?), (?, ?, ?, ?, ?, ?, ?, ?, ?), (?, ?, ?, ?, ?, ?, ?, ?, ?), (?, ?, ?, ?, ?, ?, ?, ?, ?), (?, ?, ?, ?, ?, ?, ?, ?, ?), (?, ?, ?, ?, ?, ?, ?, ?, ?), (?, ?, ?, ?, ?, ?, ?, ?, ?), (?, ?, ?, ?, ?, ?, ?, ?, ?), (?, ?, ?, ?, ?, ?, ?, ?, ?), (?, ?, ?, ?, ?, ?, ?, ?, ?), (?, ?, ?, ?, ?, ?, ?, ?, ?), (?, ?, ?, ?, ?, ?, ?, ?, ?), (?, ?, ?, ?, ?, ?, ?, ?, ?), (?, ?, ?, ?, ?, ?, ?, ?, ?), (?, ?, ?, ?, ?, ?, ?, ?, ?), (?, ?, ?, ?, ?, ?, ?, ?, ?), (?, ?, ?, ?, ?, ?, ?, ?, ?), (?, ?, ?, ?, ?, ?, ?, ?, ?), (?, ?, ?, ?, ?, ?, ?, ?, ?), (?, ?, ?, ?, ?, ?, ?, ?, ?), (?, ?, ?, ?, ?, ?, ?, ?, ?), (?, ?, ?, ?, ?, ?, ?, ?, ?), (?, ?, ?, ?, ?, ?, ?, ?, ?), (?, ?, ?, ?, ?, ?, ?, ?, ?), (?, ?, ?, ?, ?, ?, ?, ?, ?), (?, ?, ?, ?, ?, ?, ?, ?, ?), (?, ?, ?, ?, ?, ?, ?, ?, ?), (?, ?, ?, ?, ?, ?, ?, ?, ?), (?, ?, ?, ?, ?, ?, ?, ?, ?), (?, ?, ?, ?, ?, ?, ?, ?, ?), (?, ?, ?, ?, ?, ?, ?, ?, ?), (?, ?, ?, ?, ?, ?, ?, ?, ?), (?, ?, ?, ?, ?, ?, ?, ?, ?), (?, ?, ?, ?, ?, ?, ?, ?, ?), (?, ?, ?, ?, ?, ?, ?, ?, ?), (?, ?, ?, ?, ?, ?, ?, ?, ?), (?, ?, ?, ?, ?, ?, ?, ?, ?), (?, ?, ?, ?, ?, ?, ?, ?, ?), (?, ?, ?, ?, ?, ?, ?, ?, ?), (?, ?, ?, ?, ?, ?, ?, ?, ?), (?, ?, ?, ?, ?, ?, ?, ?, ?), (?, ?, ?, ?, ?, ?, ?, ?, ?), (?, ?, ?, ?, ?, ?, ?, ?, ?), (?, ?, ?, ?, ?, ?, ?, ?, ?), (?, ?, ?, ?, ?, ?, ?, ?, ?), (?, ?, ?, ?, ?, ?, ?, ?, ?), (?, ?, ?, ?, ?, ?, ?, ?, ?), (?, ?, ?, ?, ?, ?, ?, ?, ?), (?, ?, ?, ?, ?, ?, ?, ?, ?), (?, ?, ?, ?, ?, ?, ?, ?, ?), (?, ?, ?, ?, ?, ?, ?, ?, ?), (?, ?, ?, ?, ?, ?, ?, ?, ?), (?, ?, ?, ?, ?, ?, ?, ?, ?), (?, ?, ?, ?, ?, ?, ?, ?, ?), (?, ?, ?, ?, ?, ?, ?, ?, ?), (?, ?, ?, ?, ?, ?, ?, ?, ?), (?, ?, ?, ?, ?, ?, ?, ?, ?), (?, ?, ?, ?, ?, ?, ?, ?, ?), (?, ?, ?, ?, ?, ?, ?, ?, ?), (?, ?, ?, ?, ?, ?, ?, ?, ?), (?, ?, ?, ?, ?, ?, ?, ?, ?), (?, ?, ?, ?, ?, ?, ?, ?, ?), (?, ?, ?, ?, ?, ?, ?, ?, ?), (?, ?, ?, ?, ?, ?, ?, ?, ?), (?, ?, ?, ?, ?, ?, ?, ?, ?), (?, ?, ?, ?, ?, ?, ?, ?, ?), (?, ?, ?, ?, ?, ?, ?, ?, ?), (?, ?, ?, ?, ?, ?, ?, ?, ?), (?, ?, ?, ?, ?, ?, ?, ?, ?), (?, ?, ?, ?, ?, ?, ?, ?, ?), (?, ?, ?, ?, ?, ?, ?, ?, ?), (?, ?, ?, ?, ?, ?, ?, ?, ?), (?, ?, ?, ?, ?, ?, ?, ?, ?), (?, ?, ?, ?, ?, ?, ?, ?, ?), (?, ?, ?, ?, ?, ?, ?, ?, ?), (?, ?, ?, ?, ?, ?, ?, ?, ?), (?, ?, ?, ?, ?, ?, ?, ?, ?), (?, ?, ?, ?, ?, ?, ?, ?, ?), (?, ?, ?, ?, ?, ?, ?, ?, ?), (?, ?, ?, ?, ?, ?, ?, ?, ?), (?, ?, ?, ?, ?, ?, ?, ?, ?), (?, ?, ?, ?, ?, ?, ?, ?, ?), (?, ?, ?, ?, ?, ?, ?, ?, ?), (?, ?, ?, ?, ?, ?, ?, ?, ?), (?, ?, ?, ?, ?, ?, ?, ?, ?), (?, ?, ?, ?, ?, ?, ?, ?, ?), (?, ?, ?, ?, ?, ?, ?, ?, ?), (?, ?, ?, ?, ?, ?, ?, ?, ?), (?, ?, ?, ?, ?, ?, ?, ?, ?), (?, ?, ?, ?, ?, ?, ?, ?, ?), (?, ?, ?, ?, ?, ?, ?, ?, ?), (?, ?, ?, ?, ?, ?, ?, ?, ?), (?, ?, ?, ?, ?, ?, ?, ?, ?), (?, ?, ?, ?, ?, ?, ?, ?, ?), (?, ?, ?, ?, ?, ?, ?, ?, ?), (?, ?, ?, ?, ?, ?, ?, ?, ?), (?, ?, ?, ?, ?, ?, ?, ?, ?) at /home/magento/www/vendor/magento/framework/DB/Adapter/Pdo/Mysql.php:580, Zend_Db_Statement_Exception(code: 23000): SQLSTATE[23000]: Integrity constraint violation: 1062 Duplicate entry 'skinny-charles-3-pc-4803.html-1' for key 'URL_REWRITE_REQUEST_PATH_STORE_ID', query was: INSERT INTO `url_rewrite` (`redirect_type`,`is_autogenerated`,`metadata`,`description`,`entity_type`,`entity_id`,`request_path`,`target_path`,`store_id`) VALUES (?, ?, ?, ?, ?, ?, ?, ?, ?), (?, ?, ?, ?, ?, ?, ?, ?, ?), (?, ?, ?, ?, ?, ?, ?, ?, ?), (?, ?, ?, ?, ?, ?, ?, ?, ?), (?, ?, ?, ?, ?, ?, ?, ?, ?), (?, ?, ?, ?, ?, ?, ?, ?, ?), (?, ?, ?, ?, ?, ?, ?, ?, ?), (?, ?, ?, ?, ?, ?, ?, ?, ?), (?, ?, ?, ?, ?, ?, ?, ?, ?), (?, ?, ?, ?, ?, ?, ?, ?, ?), (?, ?, ?, ?, ?, ?, ?, ?, ?), (?, ?, ?, ?, ?, ?, ?, ?, ?), (?, ?, ?, ?, ?, ?, ?, ?, ?), (?, ?, ?, ?, ?, ?, ?, ?, ?), (?, ?, ?, ?, ?, ?, ?, ?, ?), (?, ?, ?, ?, ?, ?, ?, ?, ?), (?, ?, ?, ?, ?, ?, ?, ?, ?), (?, ?, ?, ?, ?, ?, ?, ?, ?), (?, ?, ?, ?, ?, ?, ?, ?, ?), (?, ?, ?, ?, ?, ?, ?, ?, ?), (?, ?, ?, ?, ?, ?, ?, ?, ?), (?, ?, ?, ?, ?, ?, ?, ?, ?), (?, ?, ?, ?, ?, ?, ?, ?, ?), (?, ?, ?, ?, ?, ?, ?, ?, ?), (?, ?, ?, ?, ?, ?, ?, ?, ?), (?, ?, ?, ?, ?, ?, ?, ?, ?), (?, ?, ?, ?, ?, ?, ?, ?, ?), (?, ?, ?, ?, ?, ?, ?, ?, ?), (?, ?, ?, ?, ?, ?, ?, ?, ?), (?, ?, ?, ?, ?, ?, ?, ?, ?), (?, ?, ?, ?, ?, ?, ?, ?, ?), (?, ?, ?, ?, ?, ?, ?, ?, ?), (?, ?, ?, ?, ?, ?, ?, ?, ?), (?, ?, ?, ?, ?, ?, ?, ?, ?), (?, ?, ?, ?, ?, ?, ?, ?, ?), (?, ?, ?, ?, ?, ?, ?, ?, ?), (?, ?, ?, ?, ?, ?, ?, ?, ?), (?, ?, ?, ?, ?, ?, ?, ?, ?), (?, ?, ?, ?, ?, ?, ?, ?, ?), (?, ?, ?, ?, ?, ?, ?, ?, ?), (?, ?, ?, ?, ?, ?, ?, ?, ?), (?, ?, ?, ?, ?, ?, ?, ?, ?), (?, ?, ?, ?, ?, ?, ?, ?, ?), (?, ?, ?, ?, ?, ?, ?, ?, ?), (?, ?, ?, ?, ?, ?, ?, ?, ?), (?, ?, ?, ?, ?, ?, ?, ?, ?), (?, ?, ?, ?, ?, ?, ?, ?, ?), (?, ?, ?, ?, ?, ?, ?, ?, ?), (?, ?, ?, ?, ?, ?, ?, ?, ?), (?, ?, ?, ?, ?, ?, ?, ?, ?), (?, ?, ?, ?, ?, ?, ?, ?, ?), (?, ?, ?, ?, ?, ?, ?, ?, ?), (?, ?, ?, ?, ?, ?, ?, ?, ?), (?, ?, ?, ?, ?, ?, ?, ?, ?), (?, ?, ?, ?, ?, ?, ?, ?, ?), (?, ?, ?, ?, ?, ?, ?, ?, ?), (?, ?, ?, ?, ?, ?, ?, ?, ?), (?, ?, ?, ?, ?, ?, ?, ?, ?), (?, ?, ?, ?, ?, ?, ?, ?, ?), (?, ?, ?, ?, ?, ?, ?, ?, ?), (?, ?, ?, ?, ?, ?, ?, ?, ?), (?, ?, ?, ?, ?, ?, ?, ?, ?), (?, ?, ?, ?, ?, ?, ?, ?, ?), (?, ?, ?, ?, ?, ?, ?, ?, ?), (?, ?, ?, ?, ?, ?, ?, ?, ?), (?, ?, ?, ?, ?, ?, ?, ?, ?), (?, ?, ?, ?, ?, ?, ?, ?, ?), (?, ?, ?, ?, ?, ?, ?, ?, ?), (?, ?, ?, ?, ?, ?, ?, ?, ?), (?, ?, ?, ?, ?, ?, ?, ?, ?), (?, ?, ?, ?, ?, ?, ?, ?, ?), (?, ?, ?, ?, ?, ?, ?, ?, ?), (?, ?, ?, ?, ?, ?, ?, ?, ?), (?, ?, ?, ?, ?, ?, ?, ?, ?), (?, ?, ?, ?, ?, ?, ?, ?, ?), (?, ?, ?, ?, ?, ?, ?, ?, ?), (?, ?, ?, ?, ?, ?, ?, ?, ?), (?, ?, ?, ?, ?, ?, ?, ?, ?), (?, ?, ?, ?, ?, ?, ?, ?, ?), (?, ?, ?, ?, ?, ?, ?, ?, ?), (?, ?, ?, ?, ?, ?, ?, ?, ?), (?, ?, ?, ?, ?, ?, ?, ?, ?), (?, ?, ?, ?, ?, ?, ?, ?, ?), (?, ?, ?, ?, ?, ?, ?, ?, ?), (?, ?, ?, ?, ?, ?, ?, ?, ?), (?, ?, ?, ?, ?, ?, ?, ?, ?), (?, ?, ?, ?, ?, ?, ?, ?, ?), (?, ?, ?, ?, ?, ?, ?, ?, ?), (?, ?, ?, ?, ?, ?, ?, ?, ?), (?, ?, ?, ?, ?, ?, ?, ?, ?), (?, ?, ?, ?, ?, ?, ?, ?, ?), (?, ?, ?, ?, ?, ?, ?, ?, ?), (?, ?, ?, ?, ?, ?, ?, ?, ?), (?, ?, ?, ?, ?, ?, ?, ?, ?), (?, ?, ?, ?, ?, ?, ?, ?, ?), (?, ?, ?, ?, ?, ?, ?, ?, ?), (?, ?, ?, ?, ?, ?, ?, ?, ?), (?, ?, ?, ?, ?, ?, ?, ?, ?), (?, ?, ?, ?, ?, ?, ?, ?, ?), (?, ?, ?, ?, ?, ?, ?, ?, ?) at /home/magento/www/vendor/magento/zendframework1/library/Zend/Db/Statement/Pdo.php:235, PDOException(code: 23000): SQLSTATE[23000]: Integrity constraint violation: 1062 Duplicate entry 'skinny-charles-3-pc-4803.html-1' for key 'URL_REWRITE_REQUEST_PATH_STORE_ID' at /home/magento/www/vendor/magento/zendframework1/library/Zend/Db/Statement/Pdo.php:228)"} []We query the database:
mysql> select * from url_rewrite where request_path = 'skinny-charles-3-pc-4803.html';
 ---------------- ------------- ----------- ------------------------------- ------------------------------- --------------- ---------- ------------- ------------------ ----------
| url_rewrite_id | entity_type | entity_id | request_path                  | target_path                   | redirect_type | store_id | description | is_autogenerated | metadata |
 ---------------- ------------- ----------- ------------------------------- ------------------------------- --------------- ---------- ------------- ------------------ ----------
|        1509442 | product     |      2496 | skinny-charles-3-pc-4803.html | skinny-charles-3-pc-7243.html |           301 |        1 | NULL        |                0 | NULL     |
 ---------------- ------------- ----------- ------------------------------- ------------------------------- --------------- ---------- ------------- ------------------ ----------
1 row in set (0,01 sec)

mysql> select * from url_rewrite where request_path = 'skinny-charles-3-pc-7243.html';
 ---------------- ------------- ----------- ------------------------------- ------------------------------ --------------- ---------- ------------- ------------------ ----------
| url_rewrite_id | entity_type | entity_id | request_path                  | target_path                  | redirect_type | store_id | description | is_autogenerated | metadata |
 ---------------- ------------- ----------- ------------------------------- ------------------------------ --------------- ---------- ------------- ------------------ ----------
|        1508688 | product     |      2496 | skinny-charles-3-pc-7243.html | catalog/product/view/id/2496 |             0 |        1 | NULL        |                1 | NULL     |
 ---------------- ------------- ----------- ------------------------------- ------------------------------ --------------- ---------- ------------- ------------------ ----------
1 row in set (0,00 sec)
It turns out that this URL had already been used for the product with ID 2496, and in the database, there’s a 301 redirect to this product’s page. But later it turned out that this 301 redirect leads to a 404 page anyway since the product had been Disabled and isn’t visible on the front end. This means that this 301 redirect can be deleted from the database without any negative consequences.
3. The following message was found on the site when checking the exception.log file
View code:
2019-02-11 13:00:03] main.CRITICAL: Warning: Missing argument 1 for Magento\Framework\Mview\View\Changelog::clear(), called in /home/magento/www/vendor/magento/framework/Interception/Interceptor.php on line 58 and defined in /home/magento/www/vendor/magento/framework/Mview/View/Changelog.php on line 116 {"exception":"[object] (Exception(code: 0): Warning: Missing argument 1 for Magento\\Framework\\Mview\\View\\Changelog::clear(), called in /home/magento/www/vendor/magento/framework/Interception/Interceptor.php on line 58 and defined in /home/magento/www/vendor/magento/framework/Mview/View/Changelog.php on line 116 at /home/magento/www/vendor/magento/framework/App/ErrorHandler.php:61)"}This error occurs when rebuilding indexes. Since the method is called in the Interceptor trait, the reason for the error is most likely a plugin that was written incorrectly. We check all the plugins defined in di.xml for the class Magento\Framework\Mview\View\Changelog. We find this definition in the Amasty Order Attributes module.
<type name="Magento\Framework\Mview\View\Changelog">
    <plugin name="Amasty_Orderattr::ChangelogPlugin" type="Amasty\Orderattr\Model\Indexer\Mview\ChangelogPlugin" />
</type>
In module version 3.4.5 this class contains the following method:
public function aroundClear(\Magento\Framework\Mview\View\Changelog $subject, \Closure $proceed)
    {
        if ($this->isAmastyView($subject)) {
            $this->changelog->setViewId($subject->getViewId());
            return $this->changelog->clear();
        } else {
            return $proceed();
        }
Since the original clear method of the class, Magento\Framework\Mview\View\Changelog looks like this in Magento 2.2.6:
public function clear($versionId)
{
    $changelogTableName = $this->resource->getTableName($this->getName());
    if (!$this->connection->isTableExists($changelogTableName)) {
        throw new ChangelogTableNotExistsException(new Phrase("Table %1 does not exist", [$changelogTableName]));
    }
    $this->connection->delete($changelogTableName, ['version_id < ?' => (int)$versionId]);
    return true;
}
Since the method has the mandatory $versionId parameter, this error is thrown when attempting to call the parent method from the plugin. Amasty corrected this error in version 3.4.8, where the plugin method looks as follows:
public function aroundClear(\Magento\Framework\Mview\View\Changelog $subject, \Closure $proceed, $versionId)
{
    if ($this->isAmastyView($subject)) {
        $this->changelog->setViewId($subject->getViewId());
        return $this->changelog->clear($versionId);
    } else {
        return $proceed($versionId);
    }
}
As you can see, the problem was caused by incompatibility between the module version and Magento version, and it was solved by updating the module.
Best Magento Clothing Websites Design
Magento’s potential for customization and personalization makes it ideal for any eCommerce niche. You can create an online store with any functionality, and it offers loads of features, color options, themes, and custom modules. These features stand head and shoulders above the rest when it comes to clothing websites design.
Magento offers a clean design and easy navigation, allowing you to showcase apparel and enhance customer engagement. When it’s time for you to design online store website, Magento is the way to go. Let’s look at some of the tops of the line fashion websites built with Magento.
List of Cool Clothing Websites
Fashion websites have become the highest grossing eCommerce sites on the web. They currently account for more than 20% of all online sales worldwide.
Magento is one of the market leaders in eCommerce, accounting for nearly 12% of the market share. It allows business owners to manage merchandising and logistics easily. Plus, with Magento, the user experience is personalized, boosting customer engagement and increasing sales.
Whether you work with women’s clothing, menswear, children’s apparel, or all of the above, Magento offers solutions to grow your business and raise your profit margin.
Websites with Modern Design in the USA
Revenue from fashion sites has been growing steadily in the US since 2003. According to Statista, it amounted to 108 billion dollars in 2018 and is projected to top 139 billion dollars in 2023. This makes the fashion industry one of the strongest online sellers in America and across the globe. Here is a selection of USA-based fashion stores that show what Magento can do for different fashion niches.
HUF

HUF is a premium skate apparel company. The website makes use of high-quality images and photo galleries that showcase their featured lines and best sellers, right on the home page.

The site is clean and loads quickly. HUF has also offered free shipping for all orders in the US and a small flat fee for international orders.
7 For All Mankind

7 For All Mankind specializes in denim apparel for men and women. The homepage features attractive images and headlines with a 10% off deal for new customers. They include a store locator and many payment options on the site. 7 For All Mankind also makes excellent use of content for brand building.

The look of the store is simple, and you zero in on the clothing and featured products, as there is no distracting colors or blocks.
Mara Hoffman

Mara Hoffman focuses exclusively on women’s fashion wear. They have created a minimalist site with a homepage that presents the new lines and top sellers with beautiful, high-quality images.

The website design is elegant. The store is extremely easy to navigate, offering a list of all categories in a sidebar and search options to sort by price, size, and season. The store has creative globe shaped popups as well as simple registration forms and intuitive interface.
Zumiez

Zumiez offers men’s and women’s outerwear and skate apparel, both with physical stores and through mail orders or online shops. The site presents loads of deals and bundling options, as well as guaranteed delivery in three days or less for selected areas.

It also includes a store locator, loads of options for exchanges and returns, and a track-your-order feature so customers can get up to date information on their purchase. The Magento theme is ideal for reflecting their brand aesthetic.
Websites with the Best Design in the UK
According to Statista, the UK has the highest online shopping penetration rate in all of Europe. And, it’s no surprise that a bulk of eCommerce purchases are made from style websites. As of 2018, more than 23 billion dollars were devoted to fashion sales. By 2023, this revenue is expected to increase to more than 31 billion dollars with a growth of nearly 2 billion dollars per year.
Fred Perry

Fred Perry is a well-established brand that offers women’s, men’s, and children’s wear. Several features on the homepage and throughout the site make use of JavaScript and Adobe Flash, showing a wide range of products while keeping the site clean and uncluttered.

Another Magento feature they make use of is the grid option for featuring images.
Parka London

Parka London specializes in parkas, jackets, and accessories, for both men and women. The site features a JavaScript slide image and interactive image plugins to boost customer engagement and showcase the brand aesthetic.

Ease of navigation, collapsed menu options, and clear call to action buttons boost user engagement and make conversions simple.
Oliver Bonas

Oliver Bonas offers a wide range of women’s clothing, fashion accessories, and home decor. The store features an attractive slide gallery and rotating images on the homepage.

The collapsible sidebar menu helps customers to find the products they want quickly and with a minimum of fuss. Plus, they have an entire page devoted to featured sales.
Paul Smith

Paul Smith is a fashion company that caters to both men and women. Their clean, professional design reflects high-quality products, and they feature a banner on the homepage that offers free shipping for orders over 200£.

The Magento grid layout allows customers to browse entire collections quickly and easily.
Missguided

Missguided is a company that specializes in women’s clothing. The homepage showcases all categories in a row of images that each link to a category page. It also has a popup for new customers offering 20% off of the first purchase.

The site offers some unique features, including a countdown timer for free delivery and other deals.
Scandinavian Websites with Modern Design
eCommerce revenue in the Scandinavian countries has been growing faster than any other region on the planet. According to the eCommerce News research, in the first six months of 2018 alone, revenues from eCommerce increased by 11%. About 60% of the population shops online each year, more than 12 million consumers. This makes the Nordic area a hot region for fashion, beauty, and lifestyle purchases.
Filippa K

Filippa is the leading Scandinavian fashion brand. It offers a wide range of styles for both men’s and women’s clothing, as well as accessories and clothing care products.

The site makes use of Magento’s grid options to showcase product lines on the home page. It also features a store locator and subscription options. Plus, the homepage banner advertises free delivery worldwide and free 30-day return policy.
Björn Borg

Bjorn Borg offers mid-range clothing options for both men and women, emphasizing a unique, hip style. The site makes use of Magento’s language options to expand their reach to global proportions.

The website design is clean with rich, high-quality images and a sleek, artful look. Shipping options can also be modified from the home page to suit the customer.
Scandi Mini

Women’s and children’s wear, accessories, fashionable home décor, stationery, picnic supplies, Scandi Mini has whatever you need to spruce up your home and your look. They feature a pinned icon for customer contact, boosting user engagement and letting the customers know that they are valued.

The clean, professional design of the site is minimalistic while still offering a comprehensive look with their different products and styles.
Eton

Eton is a fashion company that specializes in men’s shirts and accessories. The homepage banner advertises free returns and guaranteed delivery within 2-5 business days. The site boasts elegance, reflecting the value of the product.

Clothing categories are features at the bottom of the homepage with high-quality images that link to the category page. Plus, ease of navigation makes it simple to go from a visit to a sale. Eton also features a wide range of payment options to suit the needs of any customer.
Tretorn

Tretorn offers women’s and men’s clothing and shoes. The Magento-driven site showcases a clean, professional theme with a call to action buttons that let the user browse by trend or explore new products.

They also have a page devoted entirely to sales. Tretorn does an excellent job with brand building, featuring a page dedicated to the ethic and style of the brand alongside blogs that showcase special lines.
As you can see, there’s no end to the customizable fashion options provided by Magento. Whatever your niche or brand, Magento offers the themes, stock modules, and functionality you need, and you can build your own perfect store with it.
WEB4PRO Attended E-commerce Germany Awards 2019
We always pleased with how fast eCommerce community and number of eCommerce events are growing. Keeping this in mind, we are trying to get the most of it providing the value and expertise sharing articles, contributing to the tech and eCommerce society.
Also, we love to attend conferences for their practical parts with presentations from the most experienced speakers, networking and of course the overall positive attitude of mind. Recently, our team came back from the E-commerce Germany Awards, and we want to tell more about the background of it and what was happening there.
What is E-commerce Germany Awards?

E-commerce Germany Awards is the competition between companies working in eCommerce and Tech field. It has 10 contest categories and three rounds of the competition. In the end, 10 companies are nominated to participate in the final round and then 1 company wins in each category.
Our company, WEB4PRO was nominated in the Best Agency 2019 category, and we made it to the last round. We are grateful for having this opportunity to take part in such a great event.

But that was not all. Besides, there was a huge exhibition with lots of products, services, and tools presented for a different area of focus in eCommerce. People who were looking for some specific solutions for their businesses or partners could use this time for their advantage. So below we will talk a little bit more about the exhibition and lectures.
E-commerce Berlin EXPO

E-commerce Berlin is one of the biggest eCommerce events in Europe. It provides business opportunities for people from eCommerce and retail: merchants, service providers, hosting providers, platforms and business solutions, logistics and payment processing, and for others.
Useful for you:

Exhibition with more than 115 companies, presentations from industry leaders and overall atmosphere connected 5000 people from all over the world. For us, it was such a great time and practical experience to learn about innovations and best practices in eCommerce from experts in this field.
Tips to Work on Magento Categories
Here you will find out how to work with categories in Magento store.
A Category is needed to establish the structure of your store’s Catalog. Before creating categories you need to think about the usability of your product page, so the user can browse product from one category and easily navigate to different subsections. Try to be consistent and use the same approach for all product types in your catalog.
To create categories, use the admin panel. Below, we will show how to create and add categories, and answer other questions related to working with categories.
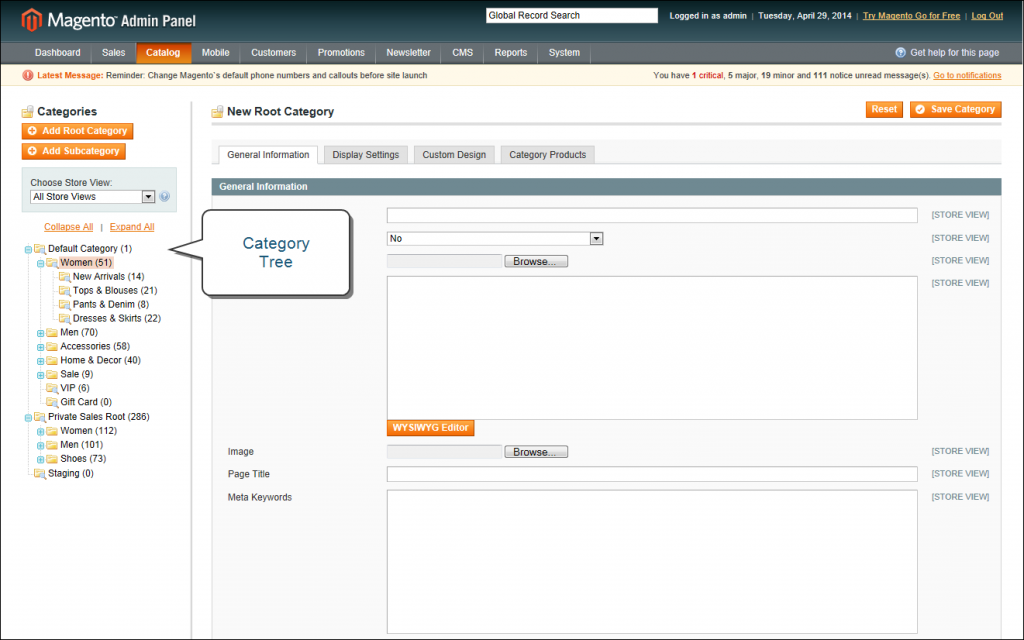
How to Create Category in Magento 1
Step 1. On the Admin menu, select Catalog > Manage Categories.
Step 2. Before you begin, set Choose Store View to the store or view. By default, the scope of the category configuration is set to “All Store Views.”
Step 3. In the category tree, click the category that is to be the parent of the new category. The parent is the level just above the new category.
If you’re starting from the beginning without any data, there might be only two categories in the list: “Default Category,” which is the root, and an “Example Category.”
Step 4. Click the Add Subcategory button.
After creating the category, you need to add them to create the catalog structure. Learn how to do it from the below guide.
How to Add Category in Magento 2
Step 1. Login in Magento Admin.
Step 2. Select Products -> Categories.
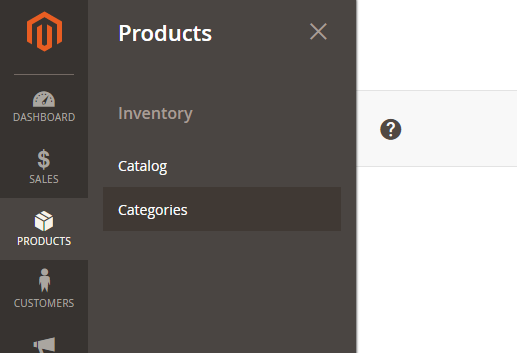
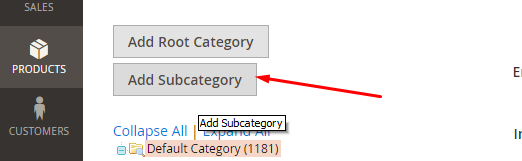
Step 3. Select Parent or Root Category in which you need to insert your new category and click “Add Subcategory” or you can create Root Category.
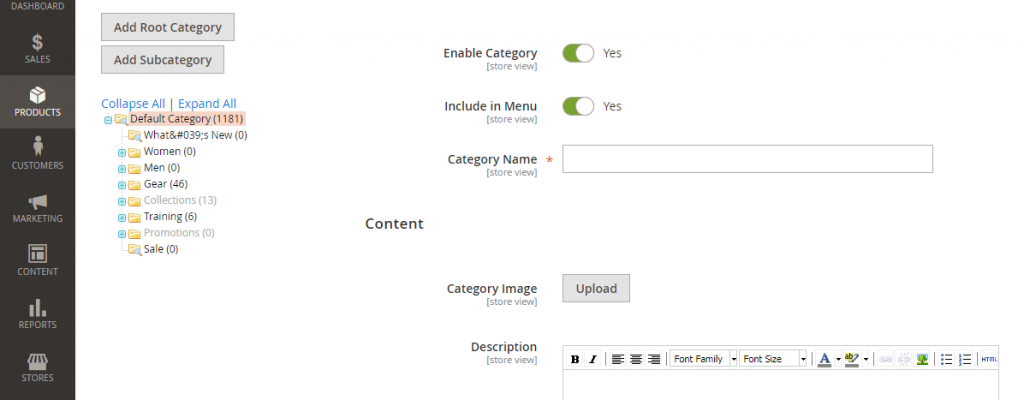
Step 4. Enter Category data. Category Name is required entry. Click the Save button.
Why Is Drupal Website Beneficial for Your Business?
With technology developing so quickly, the most important decision when you make eCommerce website is which content management system to use. The CMS handles the functionality of the site. Select the right CMS, and your site will be scalable and easily accessible across a wide range of devices. To keep up with the times, online stores also need to offer simple navigation and a personalized experience rich with interactive elements.
Drupal is a cutting edge CMS that offers top of the line digital solutions for all of your eCommerce needs. You might ask, “What is the use of Drupal? Why should I decide to make a Drupal 8 store when there are so many other choices out there?”
The answer is simple. Drupal offers customizability, flexibility, and security. It’s a modular, open source CMS that lets you tailor your site to your brand, functionality, and approach. It’s perfect for all businesses, from the largest to the smallest. Plus, its solid, versatile design lets you modify the site and develop it with a minimum of a hassle.
Let’s take a look at some of Drupal’s benefits and how some major companies have used Drupal sites to improve their business and reach new heights of success.
Benefits of Drupal Web Platform

When you create a website using Drupal, you tap into a wide range of benefits that are hard to find in any other CMS. First and foremost, customers want security. They want to be confident when entering their information to make a purchase.
Drupal Commerce offers the highest rated security currently available. It has never yet been subject to a widely exploited vulnerability, and regular patches and safeguard measures are issued to improve its safety continually.
Another great feature is that it is open source and has the backing of a strong Drupal community that exchanges ideas and innovations. Its unique design lets you add as many new web pages as you want without having to adjust the infrastructure.
Let’s have a look at the main benefits of Drupal:
Flexibility
Drupal 8 websites are modular, so they can be easily customized with thousands of plug-ins and modules to give you exactly the functionality you want.
It comes packed with custom features that can be modified, adjusted, and implemented as needed. These include features for social media, SEO, CRM, and security. Drupal also lets you manage and create many different types of content.
A site built with Drupal is designed to handle blogs, articles, polls, statistics, videos, and other content types. It lets you create content-rich sites for any niche, from media to marketing. Also, since it’s easy to edit design elements, the web page configurations can be made as simple or as complex as needed.
Personalization and Great UX
Your website is your storefront. It carries the theme and message of your brand. So, it needs to be personalized to reflect what you have to offer. Personalization is what makes the difference between a conversion and a bounce.
Drupal provides a broad range of themes and color pallets suitable for any purpose. Its advanced system is simple to build and maintain. Drupal comes stocked with built-in tools for user interface (UI) and user experience (UX).
The result is that you can offer the customer a targeted, interactive experience with intuitive navigation and a user-friendly interface. Plus, Drupal customer support is second to none. Whatever the needs of your site and your customer, they can be met with a minimum of hassle.
Mobile-first Architecture
There are more mobile devices in existence now than ever before, and they are more accessible to the global population. So, one of the most important things to keep your site competitive is to make it not only mobile-friendly but mobile first.
When sites are designed around desktop architecture, it can be challenging to optimize the mobile experience fully. Drupal 8 is designed with this trend in mind, suitable for desktop but designed mobile-first. This means that the Drupal mobile site comes fully optimized for mobile devices. This saves time and effort, as well as making sure that your site is accessible to anyone, anywhere.
All-In-One: CMS for Different Business Needs
Whatever you need for your eCommerce store, Drupal brings it within reach. Successful sites are based on customer needs. They guide them through discovery and purchase of products or services, making it a breeze for them to find any information they want along the way.
Drupal 8 eCommerce modules let you tailor site functionality to the user experience you’d like to provide. They let you connect with and engage the audience through Google Analytics modules, robust APIs, and a versatile system interface that can fit any system architecture you need.
Also, your Drupal store incorporates a wide range of features and tools that improve the experience for both developers and users. It is easy to develop a store in a short period, plus optimization and security is a strong side of Drupal CMS.
Useful for you:
Drupal Great Website Examples
The current trend is for static sites to dwindle and make room for dynamic content. The content management system needs to be robust, accessible through a range of digital contact points, and abreast of current trends in customer engagement. Drupal excels at eCommerce. This is reflected by the many high-profile companies that have used it for their eCommerce websites.
To give you the overall vision of the best Drupal eCommerce sites, we’ve prepared a list of them based on the most successful companies:
Box Platform

Box is a company that specializes in collaboration software and simple file sharing. All of their services are online, unlike Tesla. They’ve used Drupal to create a website that showcases their online solutions clearly and easily. It’s user-friendly and efficient, with a crisp professional feel.
The site gives direct access to their proprietary software and code, which can be integrated with other digital solutions, like Google Apps, IBM, Slack, and Office 365. Box currently services many high profile clients, including Pandora, Boston Scientific, and P&G.
LUSH

LUSH is a site that offers premium handmade soaps and body care supplies. Their site uses Drupal Commerce features to combine commerce and content, providing inspiring stories that reach users across the globe. Users can reach the site easily through any device.
The site is clean and streamlined. It engages the customer with an introduction page featuring the newest line and clear call to action buttons. The setup practically guarantees click-throughs.
Useful for you:
Pinterest Business

Pinterest is a great place to share images, quotes, recipes, and other forms of online content. It’s image-rich and has a reach of over 175 million users. Pinterest Business was created as a branch of the parent site, designed for presented services and products to this Pinterest audience.
Once again, this is a Drupal store. It integrates seamlessly with the main website, which was built with Python. And easy is the keyword here. It’s simple to add subpages, implement additional functionalities, and integrate with external systems. Drupal has allowed Pinterest to link their existing audience with a new service in a fraction of the time required for making an entirely new website.
Royal Mail

Royal Mail is a UK based site that offers a wide range of solutions for delivering, receiving, and redirecting mail. It also allows customers to track items, buy and print postage, and pay fees online.
Drupal Commerce has allowed them to develop a simple REST API that serves and seamlessly integrates multiple sites. The result is a content data server that combines all of their many services into one easily accessible contact point.
Savant

Savant is a service-oriented industry that offers home automation systems. Their goal was to craft an immersive experience with a modular CMS that is simple to maintain and update.
Drupal was the perfect solution. It offers strong performance, versatility, and a modular architecture that can be adjusted or scaled as necessary without a major overhaul to the whole site.
Platform longevity is key, as digital developments are moving so quickly that a poorly planned CMS can make the site obsolete in no time. This is especially important for Savant, as it is a technological service that is constantly expanding into new markets. The website reflects this, emphasizing imagery and animation and reflecting the feeling of the brand.
Hermès

Hermes offers a wide range of products including women’s clothing, menswear, perfume, and fashion accessories. Their site makes use of video plugins to feature fashion shows that present their clothing lines in all their glory. It is based on Drupal Commerce and we see that it works great for the business benefits.
It also has branded preloader, perfect site colors, and fonts that represent a brand and strengthen its positions in customers’ mind. Besides smart design with various useful blocks to showcase products perfectly, it has high-quality images, and let customer complete the purchase. They offer a wide range of shipping and payment options and integrate their physical store with their online market with tools to find the brick and mortar shop nearest you.
Manhattan

Manhattan Associates is a company based in connecting suppliers with buyers to build an entire supply chain. To broaden the client base and meet digital strategy goals, they decided to have a premium site built with Drupal 8.
With a global client base, Manhattan required marketing automation, integration with third-party services and tech, and translation services. Given that their operations work on a massive scope and have many moving parts, Manhattan also needed a site that could fully integrate the CRM and powerful editorial tools to educate customers and users in the best use of the services.
Their website is fast, responsive, and clean. The homepage offers testimonials, demos, and CTAs. This site is an example of the power of Drupal to coordinate a host of complex functions and different services.
As you can see, Drupal is being used by some of the biggest names in commerce by niches ranging from online services to physical products. With a CMS this robust and versatile, the sky’s the limit!
Magento One Step Checkout: How to Choose and Work with It
Using a simplified checkout is an optimal way to make your store run more smoothly and quickly. That said, how are you supposed to choose between the various one-step checkouts and how can you work with one of them for your business benefits?
Below, we’re going to tell you what are the main benefits of one step checkout that are already proved by merchants. Also, the most important that you will find here list of the best one step checkout extensions for your Magento store.
Benefits of Magento One Page Checkout
To get started, let’s talk about why you should use Magento’s One-Page Checkout.
- It’s easy to use. Your customers can check out and view their shopping cart from a single page to ensure their patients and satisfaction. For merchants, this is easy to use because it provides you with a way to customize your site without coding.
- It’s user-friendly. Since the entire process becomes simpler for your customers, you can make user-friendly checkout page and attract customers with easy checkout steps.
- It quickens the checkout time. When you aren’t being redirected to a multitude of different pages, you can complete your checkout faster. By filling out a simple form, you will save clients’ time and reduce the abandoned carts rate.
- It’ll improve sales results. By using Magento One Page Checkout, you’re reducing the number of steps your customers need to make to complete their purchase. By limiting the chances for your customers to be overwhelmed, they’ll be loyal to the brand or store and complete their purchases more often.
Useful for you:
Magento 2 Checkout Process
The great thing about this checkout process is that customers don’t need to sign up for accounts if they don’t want to and if they do, they can wait until they check out. If you’re on the fence about whether you should ask your customers to sign up, there are some benefits to doing so. The major benefit of having customers sign up is that when they need to check out, their billing information will be filled in immediately.
Magento 2’s checkout process also ensures that when someone is checking out, the system filters through existing user emails to find out if the customer has an account. This is beneficial to you because customers are less likely to abandon their accounts if you make it easy for them to check out.
Magento has integrated the one-step process with an address suggestion space. When someone goes to check out, then, a number of different addresses are suggested to quicken the entire process.
One Step Checkout Extensions for Magento 2
Now you can learn more about which extensions will work for you. Here are some features you might come across with these extensions:
- One-step checkout
- Gift wrapping
- Pre-planned delivery date
- Track conversions
- Free demo

One Step Checkout by Mageplaza
Price: from $199 to $429.
A major benefit of using One Step Checkout by Mageplaza is that it helps you to increase the conversion rate of your eCommerce store and it makes checkouts more direct. When you use this tool, nearly all payment methods are accepted; therefore, none of your customers will be left out during the checkout process. If you suspect that some of your clients or customers will be buying gifts, you can ask them if they want to have their products gift wrapped.
One Step Checkout by Landofcoder
Price: $89 for a single license 12 months of support.
According to the website, this extension is best for those who are looking for a clean interface, who want to provide their customers with coupons, and for those who want to provide their customers with the option for the desired delivery date.
The Magento 3 checkout template for this one step checkout is user-friendly and provides you with an easy way to edit your overall store.
One Step Checkout by Aheadworks
Price: $299
With Aheadworks’ extension, you can track conversions through checkout phases. By determining how efficient each field is, you’ll be able to adjust your checkout process to tailor to your individual clientele.
Your checkout page directly affects your sales. It’s the last point of sale and as such, it’s the last chance for you to make a good impression. If your customers aren’t sure about certain products, your checkout page is the last chance for them to make a decision. That’s why it’s so important for you to have a checkout page that assesses and adapts to your needs.
One Step Checkout by Magestore
Price: $299 free support for 90 days.
Magestore is known for being host to a number of different Magento extensions. Their One Step Checkout extension has similar features to the aforementioned extensions and overall, it’s a good balance between price and quality.
One Step Checkout by Amasty
Price: $249 for the Open Source and for the Commerce edition is $549.
From a single checkout page, your customers will be able to add addresses efficiently with Google suggestions and they’ll be able to edit them on the same page. If you’re not sure whether you want to use this extension, Amasty does have extension demos for you to try out. With their easy-to-use Magento checkout page customization, you shouldn’t have a problem of using this extension to make your site checkout simple and accessible!
Useful for you:
One Step Checkout Magento Extension Options
Aside from classic one step checkout extensions, you also have one step checkout for M1 extensions. To learn more about these, keep reading!
One Step Checkout for M1 by Aheadworks
Price: $159.
In a classic checkout system, your customers may experience between 5 to 10 steps. With Aheadworks’ one step checkout, you can reduce these to a single step. For $159 you can do the following:
- Provide them with upfront information
- Provide an estimate of how long the process will be
- Provide transparency
One Step Checkout for M1 by Amasty
Price: $159 for the Open Source and $359 for the Commerce edition.
With Amasty, your eCommerce store’s shopping cart will be on the same page as the checkout page. Not only this, but you can have complete control over the fields your customers need to hand in.
One Step Checkout for M1 by Apptha
Price: Free.
Apptha provides merchants with the ability to provide customers with, or to have control over, the following:
- Support in different languages to ensure you’re always understood and taken care of.
- Control over checkout options.
- Control over your site’s individual terms and conditions.
- Control over different gift options for customers.
One Step Checkout for M1 by Iwdagency
Price: Free version or 25$ monthly for the advanced features list.
With Iwdagency, you have the option of using the free or the professional version of the extension. Like you might guess, the professional version of the extension will provide you with more features. This one step checkout supports a number of different payment options for both the free and professional version. The version you have to pay for, however, will provide you with the following features:
- Support and installation at no extra cost.
- Your customers will have the opportunity to buy or receive gift cards.
- Your customers can have subscription services.
One Step Checkout for M1 by Mageplug
Price: $159 plus 90 days of free support.
According to MageCheckout, carts are abandoned, on average, over 60% of the time. At the end of the day, online shopping can be long and complicated. For impulsive shoppers, this process provides them with enough time to think and close the page completely. When you have one step checkout, your customers can shop more quickly, and as such, they’ll spend more money.
Here’s a short summary of this extension’s features:
- Reduction of abandoned carts
- Increased conversions
- Increased sales
Tips on How to Start an eCommerce Business
Starting an eCommerce business is becoming a daily dream for lots of visionary business people. Business merchants wrestle with the question; when and how should one start an eCommerce business. It is a hard nut to crack. With the internet, there are lots of tips and strategies out there that needs careful consideration before taking an action plan.
The Internet has made many business people successful, and it has equally misled several businesses. It’s upon business merchants to carefully sift through what they read. This guide provides an original approach on how to start an eCommerce business.
Create Your Own Company Name
Ideally, a good business name for eCommerce website should relay the skills, services offered, and uniqueness. There is so much than meets the eye in your business name, and therefore it’s better to take sufficient time creating business name before you back it up with the right marketing strategy. Be unique- instead of trying to capture all brands in the company name focus on a single essential element.
You can either use phrases, Compound nouns or transmutations to give your company a good name. Choosing the right business name requires creativity, evade power words. A short name has a powerful gesture than a long one. Remember, your business name shouldn’t capture everything leave something for the imagination. If you follow the outlined process, you will discover an outstanding trademark.
Register Your Own Brand Name
Registering a business brand name is a straightforward process. It only takes less than 90 minutes when the application is made online. The shortest way to register is on the U.S Trademark Office’s Website.
Before you acquire the brand name pause enough to check the Trademark Electronic Search System to be certain that no other company that bears such a brand name.
- You must have the Employer Identification Number (EIN) to actualize the process. It’s a requirement to be able to open a bank account for the payment of the taxes. Remember the process will stall if you don’t get valid business licenses and permits.
- Before you begin operating consult with your state to ascertain the sales tax permits you need. In the end, you should have all the business permits and licenses to comply with the law.
Secure Your eCommerce Domain Name and Website
Creating your website entails choosing your domain name. Web hosting providers provide domain names, and you can choose to buy from either of them. You will then be required to enter the domain name into a text box.
Keyword optimization determines the domain name. You require a great keyword to invent a domain name that will increase traffic in of your site. Remember webmasters don’t use pompous words for URL.
To see how it works open Godaddy.com and enter the chosen keyword. GoDaddy.com scans the names under the submitted keyword. It extracts all the taken names, and then it provides you with suggestions for the appropriate possible names.
Select the Best eCommerce Business Structure
Many business owners wrestle with the question: What is the best eCommerce business structure? We are pleased to tackle this issue in depth. There are three business structures.
Sole Proprietorship
In this structure, you and your business are intertwined. You own all business assets and loses. This structure requires no long-term tax planning. A sole proprietorship is the highly recommended business structure since you don’t need a business license to run sole proprietorship under your name.
Partnership
In partnership, any profit or loss is shared equally to all members according to the percentage of their contribution, and the government doesn’t tax individuals. A partnership is known for its lower compliance cost. If several members are in a connection, the cost of tax work becomes less.
If the partnership is not a general one, then it is a limited partnership. In a general partnership, all members are bound to damages of the business with impeachable liability, but in a limited partnership, the non-active members are only obliged to the amount they have invested in the business.
Corporation
A corporation is an independent legal unity with its mechanisms, constitution, and management officers. The bearers of the corporation run it as a separate entity, and a member can sue it if need be. Therefore you don’t require this type of structure for online eCommerce platform because of its technicalities.
You can either start trading as a partnership or a sole proprietor. However, we normally advise our clients to consider the repercussion when incorporating their eCommerce business. A partnership is the best structure for any online store since with it you avoid major conflicts in the future.
Find the Right eCommerce Vendor
To find eCommerce vendors write down how you want to acquire your orders. Some eCommerce businesses prefer drop shipping while others choose to store their products in a warehouse set for shipping when an order is placed.
To get the best price link with the supplier and shun the middlemen. You connect with them through a phone call; you need to link someone (supplier) who can make a decision. If you connect with the supplier, you cut down cost hence making bigger profits. You also can negotiate for a better price.
In as much as you need to reduce the cost, you don’t need to interfere with the quality of the product. For the best quality, you ought to ask for samples from your vendors. Through this tactic, you will ascertain what your customers prefer. Since there are many vendors out there, don’t deal with the ones who don’t avail samples to you.
Useful for you:
Start with Marketing a New Business Online
Many business merchants get too busy with their companies to spend time when selling online.
Marketing is the backbone of business success; actually, you should start with marketing your new business online before you open it. We present to you simple and effective ways on how to market your online store by yourself.
Discover the structure that best suits you. To understand eCommerce marketing for small businesses, you should know that trending online is an investment. Each different business structure works differently for each category of customers. Acquaint yourself with varying models of business before you choose what to sell online.
Design excellent social media profiles. Become a staunch member of business groups-in that offer advice on social media. If you take the provided information, you become a guru in your field which ultimately improves your reputation hence boosting your sales. Use Facebook and Twitter, for instance, to give discounts to promote your products. Get gifted writers who can do quality content for your blog. Get blogs to do a search for your niche and install a free social sharing plugin. Make sure that the readers can share the content for your blog.
Manage Work Processes with the Right eCommerce Software
When marketing your online store, you need the best eCommerce software that can efficiently manage the online store and aid in processing payment. You can either create your software or purchase.
To attract more customers to your website there must be clear-cut strategies that aid in managing your store online. Also, one of the most important decisions you take is choosing the right platform for your future store. If you just start, you can either sell on the marketplace or create a store. There are some free options as Wix and Etsy, but to grow you need something more scalable to have a room for upgrades.
We’ve written a lot o the articles covering platforms’ comparison for the past year. In short, the strongest competitors on the market are WooCommerce, Magento, Shopify, PrestaShop, OpenCart and BigCommerce.
Useful for you:
According to BuiltWith, all of these platforms shared eCommerce software market with each other.

Another source, SimilarTech, shows that among the most popular platforms are WooCommerce, Shopify, Squarespace Commerce and Magento (all versions). Each platform has its benefits and pitfalls, but we found out that Magento is the most flexible and scalable solution.

Magento is the best eCommerce software that does well with any type of business. It has unique features compared to other software. With Magento, you go live quickly. It has a Cloud hosting and deployment feature to accelerate your sales hence connecting you with certified partners. Cloud hosting helps reduce the cost by enabling you to monitor and host eCommerce solutions by yourself.
Not only this, you can add as much functionality as you want. Different extensions from the marketplace and custom solutions will serve for your business benefits. To go deeper through this topic, you can check our research on the top eCommerce platforms and their features comparison on the Clutch blog.
Useful for you:
Design Your Store Online
After creating a name for your brand and store, and choosing the platform to start, you need to think about unique web design. If you have an online clothing store, ensure that your site has high-quality photos. Fill your store with colorful patterns of shirts, trousers, shorts, and jackets. Customers buy what appeases their eyes; therefore, feed their eyes with what they wish to see, and they will purchase something good.
Useful for you:
Further Development of Your eCommerce Business
After you’ve made all the important steps with documents, you’ve chosen the product that you’ll sell, you have the store, and it’s already working. However, you want to grow, and increase your sales. That’s where you can consider of improving your business strategy, and develop your brand. We recommend you to look at 9 practical tips that are adopted by successful companies, and try them for your business growth.
Useful for you:
How to Create Attribute in Magento
In Magento, an attribute means any property of a product and you can add as many attributes as you need. They can be grouped into attribute sets, so similar products can be created with the same attributes. In this section, you will learn how to work with attributes, create, add, and change them from the admin store view or programmatically.
Let’s say we want to create an attribute called “Material”.
Step 1. Log into the Magento admin panel. Go to Catalog -> Attributes -> Manage Attributes

There you will see all the attributes used in your system.
Step 2. In the top right, click on “Add New Attribute”

Step 3. In the Properties tab you will need to configure the Attribute Properties:

- Attribute Identifier: the name of the attribute used by the system. E.g. material.
- Scope: allows you to declare the attribute value saving scope like Global ( the value of this attribute for a given product must be the same for all websites and stores on this Magento installation), Store View (the value of this attribute for a given product can differ in all Websites and all Store Views), Website (the value of this attribute for a given product can differ in different Websites, however, it cannot differ between Store Views contained under the same Website).
- Catalog Input Type for Store Owner: describes what kind of data the attribute will store. For instance, if you want to manually enter the value for each product into a text field, select Text Field etc. In our case, we want to use Dropdown.
- Unique Value: select “yes” if you want the data saved in this attribute to be unique for each product. But we rather use “no”, because different product types may be made of the same material.
- Values Required: we are using “yes” since all our products are made of some material.
- Input Validation for Store Owner: decides whether the data entered by the store owner is validated when the product is saved. In our particular case, we don’t need validation on this field, so we’ll choose “None”.
- Apply To: determines for which Product Types this attribute will display. If you chose “Select product types” in the drop-down menu, you can set “material” to not apply to grouped/simple/configurable etc product or just use “All Product Types.
Step 4. And the settings for Frontend Properties:

- Use in quick/advanced search: If “yes”, the data saved in this attribute will be searchable in the front-end in the quick search and advanced search.
- Comparable on Front-end: If “yes”, this attribute will be displayed in a product comparison, if as at least one product in the Compare List contains a value for this attribute.
- Use in Layered Navigation (can be used only with catalog input type Dropdown, Multiple Select and Price). Since we selected “Dropdown”, this option is active and we can select e.g. Filterable (with results).
- Position: determines the position of this attribute in the Layered Nav menu.
- Visible on Catalog Pages on Front-end: If “no”, this attribute will not be displayed in the product info page. The “visibility” only controls whether or not the attribute displays in the front-end. Keep in mind – if you set an attribute to “Visible: No”, and leave it as “Comparable: Yes”, this attribute will still show up in comparison charts.
Step 5. Click on the Manage Label/Options tab. Under this tab, you can name the attribute on the front-end by the attribute label. You can enter different labels for different. If a store’s label is blank, this store will look to the default label and use this one. Here we’ll enter “Material” under “Admin” and under “English”. Then, under the Manage Options (values of your attribute) we’ll enter lycra, nylon, polyester, satin, lace, silk and sheer fabric. Click Add Option each time you need a new line of fields for the attribute values. In the Position row you can enter 1,2,3 enter to position them.

Step 6. When you are ready, click Save Attribute in the top right corner.
Step 7. To apply this selectable attribute to a product, first, add it to an attribute set. Go back to the Catalog tab and select Manage Attribute Sets.

Step 8. There you will see all the attribute sets created in your system. Click Add New Set.
Step 9. Give your new attribute set a name by entering the Name filed. E.g. material. Let it be Based On -> Default. Click Save Attribute Set.

Step 10. On the next page, you will see the attribute set you’ve just created in the third column labeled Unassigned Attributes. You will drag and drop it to one of the groups in the second column. For instance, to General.

Step 11. Click Save Attribute Set in the top right.
Step 12. Now you can create a new product under Catalog -> Manage Products -> Add Product and in the Attribute Set drop-down select the attribute setyou’ve created. Then click Continue.

Step 13. Now you can proceed and create a new product based on the new product attribute group you created (“material”). Since you have added the new attribute to the General section, you will find it there in there under the General tab in the same order it was added. Once your new product is created, you can open it on the frontend to see the new attribute you have added among its details.
Next, we move on to creating an attribute in Magento 2 step-by-step.
How to Create Attribute in Magento 2
Step 1. Complete Basic and Advanced Properties information
- On the Admin panel, click Stores. In the Attributes section, select Product
- Click Add New Attribute button
- In the Attribute Properties section, do the following

- In the Default Label, enter a default label to identify the attribute
- In the Catalog Input Type for Store Owner field, select the type in input control to be used for data entry
- Text Field
- Text Area
- Date
- Yes/No
- Multiple Select
- Dropdown
- Price
- Media Image
- Fix Product Tax
- Visual Swatch
- Text Swatch

Note: If you use Dropdown and Multiple Select input types, do the following
- Under the Manage Options section, click Add Option button

- Select Default if you use the option as the default value
- If you have only one store view, let enter only the Admin value and it will be used for the storefront as well
- If you have multi-store views, let enter one value for the Admin and a translation of the value for each store view
- Click on Add Option to create multi options that you want to include in the list
- In the Values Required field, select Yes if you want to require the customers to choose an option before they can purchase products
- In the Advanced Attribute Properties section, complete the following (If needed)
- In the Attribute Code field, enter a unique Attribute Code in lowercase characters, and without space
- In the Scope field, select one of the following to indicate where in your store hierarchy the attribute can be used
* Website * Store view * Global
* In the `Unique Value` field, set to `Yes` if you want to prevent duplicate values from being entered * In the `Add to Column Options` field, set to `Yes` to add this attribute to the list of column options in the product grid. * In the `Use in Filter Options` field, set to "Yes" to add this attribute to the list of filter options in the product grid.
Step 2. Manage Labels
- Open the Manage Labels section, do the following

- Enter a title to be used as a label for the field. If your store is available in different languages, you can enter a translated title for each view.
Step 3. Describe the Storefront Properties
- Open the Storefront Properties section, do the following

- In the
Use in Searchfield, set toYesif the attribute is to be available for search - In the
Comparable on Storefrontfield, set toYesto include the attribute in Product Compare - In the Use in
Layered navigationfield, set toYesif you want to use the attribute as a filter in layered navigation - In the
Use in Search Results Layered Navigationfield, set toYesif you want to use the attribute in layered navigation on search results pages - In the
Positionfield, enter a number to indicate the relative position of the attribute in the layered navigation block - In the
Use for Promo Rule Conditionsfield, set toYesto use the attribute in price rules - In the
Allow HTML Tags on Frontendfield, set toYesallow the text to be formatted with HTML - In the
Visible on Catalog Pages on Storefrontfield, set toYesto include the attribute in log page listings - In the
Used in Product Listingfield, set toYesinclude the attribute in product listings - In the
Used for Sorting in Product Listingfield, set toYesto use the attribute as a sort parameter for product listings - When complete, click
Save Attributebutton.
What Do You Need to Know About Magento 2 Live Chat?
eCommerce is booming around the world. According to eCommerce News Europe, in Sweden users spent 6.7 billion euros while shopping online in 2017. eCommerce also makes up 10% of retail sales in the United States. The United Kingdom isn’t far behind. As a result, online storefronts must evolve. Magento® 2 encourages this growth with its integration of live chat extensions. Live chat through Magento makes real-time communication between yourself and your clients more straightforward.
What Problems Magento Support Chat Solves for eCommerce?
Integrating a live chat feature into your Magento storefront isn’t difficult, and it comes with many benefits.

Solving a Communication Barrier
There’s no more need to guess at what your customers need or exchange emails throughout several days. Live chat with Magento is instantaneous. It allows for stellar customer service, which promotes sales without delay.
Collecting Data and Analyzing Users Behaviour
A live chat Magento 2 extension also enables you to collect customer data more easily. Track behavioral trends on a moment-to-moment basis. These extensions record chat transcripts for later access. They protect and store customer information. This means that live chats are more than communication tools. They are also by-the-minute surveys of your consumer base.
Increasing Customers’ Engagement and Satisfaction
Live chat extensions also encourage marketplace empathy between merchants and consumer audience. This empathy, in turn, leads to improved customer satisfaction. The more customers are impressed by your willingness to work with them, the more business your storefront is likely to see. That’s the power of a Magento live chat extension. These extensions enable your customers to get to know you as a relatable businessperson. That relatability then translates into sales.
Useful for you:
Magento 2 Livechat Extension: 4 Outstanding Solutions
When searching for a live chat extension to include as part of your storefront, consider the following:
LiveChat for Magento 2
General consensus names LiveChat as one of the most commonly used live chat extensions compatible with Magento 2. This online chat module is easy to integrate into your storefront. Its widget stays out of users’ way and is readily accessible. LiveChat’s security features also come in handy. You can protect your clients’ private information and immediately address their concerns in real time.
LiveChat’s many features include:
- 30-day trial free of credit card
- Multi-page compatibility
- View customer’s cart
- View reports and analytics for the individual, active customers
Crisp and Magento 2.X Integrations
Crisp also serves as a responsive live chat integration for merchants on Magento 2. Including this extension as part of your storefront is cost-friendly. Crisp limits its licensor payments and ensures free trials to potential users. This Magento 2 live chat extension also prides itself on its multi-site operations.
Crisp includes features such as:
- Compatibility with IOS, Android, Mac, and Windows
- Unlimited site crossover
- Availability of multiple operators
- The ability to retain chatroom transcripts
Landofcoder for Magento 2
You may be looking for a more versatile live chat for Magento 2. Consider, then, Landofcoder’s updated extension. Landofcoder’s live chat extension does need you to sign up with their service. The extension is straightforward to use. It automatically records your customers’ data. The basic extension is also free. However, Landofcoder does not provide support service to their free extension. You’ll have to buy a support package if you find you need assistance.
Landofcoder’s live chat extension includes the following features:
- Direct chatting with customers
- Chat notifications and reminders
- Customer outreach
- Accessible chat interface for merchants and customers
Belvg Magento 2 Livechat
You may be more inclined, though, towards open source extensions. Luckily, Belvg’s Magento 2 live chat shares its inner workings with the whole of the Internet. Its Pure Chat module integrates a live chat window into your Magento-base store. There’s no more need to wait on emails when you have this extension working for you.
Belvg Magento 2 Livechat includes such features:
- A fully customizable chat window
- Easy-to-collect customer data
- Multi-chat support
- Chat transcripts for all conversations
Live Chat Integrations for Magento 1.x Sites
Magento 1.x continues to serve as a reputable site of eCommerce. There are a number of live chat options available for integration on Magento’s previous hub.
Live Chat by Diglin
Growing customer trust is easy with Zendesk Magento live chat extension. Diglin makes its live chat easy to embed. Storefront technicians will also be able to manage any customer difficulties with ease.
Many of the Zendesk extension’s other captivating features include:
- Free installation
- A fully customizable chat window
- The ability to include images, such as screenshots, in the chat
- Sales enhancing contact with customers
Olark Live Chat for Magento
Olark, too, offers you the opportunity, as a merchant, to respond to customer needs as soon as they arise. As a Magento live chat, it is straightforward to install and can immediately boost your sales.
Features of Olark’s live chat extension include:
- Free installation
- A fully customizable chat window
- Ability to increase the conversion rate
- Easy extension configuration and site integration
Live Chat by Vnecoms
When you’re looking for extension support for Magento 1.x, though, you’ll want to look to Vnecoms. This is the only extension on this list that isn’t free. The $159 price tag is well worth the service you’ll receive, though.
Features of Vnecoms live chat include:
- A fully customizable chat window
- User-accessible chat views
- Multi-chat support
- Customer-targeted chat conversations
WEB4PRO Became Envato Elite Author
We want to share our new exciting achievement with you – we’ve got an Elite Author Status on Envato. We couldn’t do it without you, our clients, who evaluate our work by using our email templates for business.
What Elite Author Program Means
In short, this is just the beginning of a new journey in Elite Author Program. This program highlights your sales achievements along with some other rewards and lets you use more of Envato community benefits.

Elite Author badge is showing that a company provides top quality products and has a trust of its clients. Now, we feel more dedicated and inspired to create new and improve existing products for our clients.
WEB4PRO Path on Envato

Our team is creating email templates since 2012. Handy and stylish designs are giving companies the ability to tell about their brand, deals and attract customers to their store and blog. We decided that client-oriented emails are the topmost in email marketing. With this in mind, we help our clients and other businesses to give a clear message, spending on email creation less time and put more efforts to their sales strategies.
Presenta Email Template

Our first marketing email pack Presenta was great to showcase the product from the presentation and pre-order to its selling. It was the first email template that was supported by our Emailbuilder. With it, you can edit each module (text, links, buttons, colors) and change their queue as you need.
From that time, we are grateful to all our clients that use our email templates – you inspire us to move on and create new, even better products and increase opportunities.
Magma Email Template

The most popular email template of all the time is Magma. It is a fully responsive email template with 35 modules that you can combine and edit from our Emailbuilder. It was featured by Themeforest among the best Mailchimp templates and we were very happy to deliver this module-rich template for businesses.
Useful for you:
After all, we want to highlight some of our popular email and theme-based templates for holiday deals.
Store-e and Skipper Email Templates

Among others, similar email templates packs are Store-e and Skipper. They are made for eCommerce businesses and business pitches to help you conquer new heights.
Special Email Templates for Holidays

As for the special holiday deals, we have Back2Black, BlackFriday, that help you to show all the products and discounts. Also, we have a real-time clock counter that you can set to notify your clients about the limited time of the sale. This will increase the overall demand for products/services.

Santa, XMas and other Christmas email templates help to make your email look festive and create the right message to customers showing all the best deals at your store. Theme-based emails also increase the overall conversion, as customers always look at some Christmas products as well as presents at a great price.
In total, we sold more than 3,800 items on Envato marketplace and gloriously happy to continue creating more innovative, client-oriented and creative email templates.